Embroideries

Embroideries

Friday, November 12, 2010

4-Way Bargello Orchid: Toni Gerdes, designer


UPDATE 04/24/2011:

I wanted to finish this project so that it would be practical, so I have used a 6" by 6" Sudberry House trivet for it.

Under the canvas I have added a piece of fabric of a color similar to the canvas itself because of all the unstitched areas.

Again, I am afraid that the photo is not too good because of the glass reflection.

===================================


(I am planning to go out shopping and see what
I can find that would look great in the middle of this design)

(The green leaves in the center came with the kit)


(This is the photo that came with Toni Gerdes project)


(3rd photo)


Project: 4-Way Bargello Orchid
Designer: Toni Gerdes
Type of needlework: Bargello

Photos: 6

ANG CyberPointers website: http://www.cyberpointers.org/


Comments: WORK IN PROGRESS

This is an absolutely lovely design that as member of ANG CyberPointers we received for free during our bimonthly meeting.
Toni was there in Cyberspace to help us along whenever we had questions
and she is still there even if the meeting is now over to answer our questions. Sometimes I wonder what we, stitchers, used to do before we started going online. We all used to stitch pretty much by ourselves without much communication with the other stitchers. Things sure have changed a lot since then and in this case for the better.

I started this project this past Thursday (November 4th) and I have already half of it completed. I just love these colors. I am using one of Toni's colorways, so can't get any credit for how well this is turning out to be. This is the Lavender/Green colorway.

This project can be done in 3 different sizes, mine will be the smallest size, which is 6" by 6". I thought that was a nice size as I don't always feel like ending up with big projects. Smaller also means that it takes less time to have a completed project.

In this project, there is one overdyed floss and all the rest of the threads are just Anchor floss of two different color families in different shades and 4 little plastic green leaves that will go in the middle where the dark lavender is located.

Now my big question is do I stop stitching after what has been done on the 5th photo which is the first photo above or do I continue stitching in order to do exactly as Toni Gerdes has done on her project (third photo above)?

The answer to that question is "I am not sure". If you have some opinions one way or another, I would love to hear from you. Please send me a little message at my email address here: LovetoStitch99@comcast.net .


(This is the 2nd photo showing the stitched center)


(This is the first photo taken of this project. I completed a pomegranate
motif as I wanted to see the progression of colors right away)

Monday, November 1, 2010

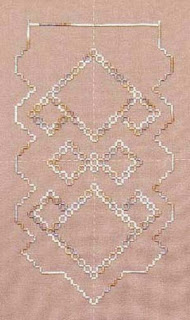
More Options in Hardanger: Dale Sokolow, designer


(Photo showing what has been completed so far in this project)


Project: More Options ... in hardanger
WORK IN PROGRESS

Designer: Dale Sokolow

Type of needlework: Hardanger

Photos: 10 so far

Another Dale hardanger project that I have stitched called "Options in Hardanger"

This is an EGA correspondence course: http://www.egausa.org/

Taken through EGA CyberStitchers: http://www.cyberstitchers.org/

Comments: The first project I have stitched from Dale was "Options in Hardanger" and when "More Options ...in hardanger came along, I decided to get on board this one too.

This piece of hardanger is done on #28 Plum Blossom Jobelan fabric using some Watercolours and Anchor #12 Pearl Cotton threads.

The size of the finished piece will be around 8" by 13 1/2".
I have already purchased my bell pull hardware for the finishing.

As you can see, most of it has been done. I still have to fill some diamond shapes, add another row of blanket stitch on top for the hardware to be enclosed in and I will be done.

While looking at the photos below I thought it was interesting to see the different color shades depending on the day's lighting. 


(1st photo taken showing upper and middle sections)

(2nd photo showing top, middle and bottom sections)


(Photo showing the beginning of outside border)


(Outside border completed)


(Photo showing the outside border added on the top and middle sections)


(Same thing but showing the bottom section)


(Photo showing additional work in upper section)


(Same thing but on bottom section)


(Work done on this project so far)

Sunday, October 31, 2010

Halloween Slideshow with projects stitched during the years


Comments:

I have always had fun stitching projects for Halloween
and I was hoping to have some new Halloween projects to add to my blog this year,
but unfortunately that has not happened
so I thought of making a little Halloween Slideshow instead
including the different projects that have been done through the years.

If you want to have more information about some of the projects included in this slideshow,
please follow this link here.

Have a fun HALLOWEEN

Saturday, October 30, 2010

Miniature boxers : Designers, the Secret Knicker Gang


(Created by Pierrette)


Project: Miniature boxers for a joke

Designer: Secret Knicker Gang

Type of needlework: Sewing

Photos: 4

Stories in past blog entries:  Miniature knickers and  ATCs 

Comments: Our little Secret Knicker Gang had so much fun with our little joke that some of us pushed the envelope just a little bit further and made some miniature boxers too.

If you want to read about what happened before this episode or just need to refresh your memory, please click on the two links above next to "Stories in past blog entries"

It all started with the miniature knickers, followed by a little story told with Artistic Trading Cards and then followed by this post with the miniature boxers.

The Secret Knicker Gang has also made the "Artistic Dolls" exchange. Unfortunately I don't have all the photos of the dolls but you can see the photos that I do have here.


(Created by Kerry)


(Created by Terry)


(Created by Terry)

Tuesday, October 26, 2010

Crazy Quilting Eyeglass case: Jill


Project: Crazy Quilting Eyeglass Case

Designer: Jill made this for me

Type of needlework: Crazy Quilting

Photos: 2

Comments: Jill made this little crazy quilting eyeglass case for me a few years back. I remember her making quite a few of them at the time, all different designs depending on each person preference.

I always had it in my mind to make a few myself, but so far I have never gotten around to it, but we just never know, one day I may surprise myself and actually make one. I have got one in mind for the longest time, so ................. (big smile)


(Photo showing the back)

Monday, October 25, 2010

Burke, Ruth Dilts, designer


Project: Burke

Designer: Ruth Dilts

Type of needlework: Needlepoint

Photos: 2


Comments: This is the first Ruth Dilts Christmas ball I have done and finished this one as a rounded ball as you can see on the photograph below.

I am now working on a second one also designed by Ruth, which is called "Windsor" and it is a gorgeous bargello design this time around.

I have not yet decided how I will finish my second one. I think it would be lovely to have it framed. It has a 7 inch circonference, so a very nice size for it.

For the finishing of "Burke" I have used some dark red velour that I had in my stash for the back of the ornament and then purchased some braid to cover the middle joint all around the ball.


(Photo showing a little bit of the back and side)

Sunday, October 24, 2010

Jingle Bells Xmas Tree Farm: Thea Dueck, designer


(Photo that came with instructions)


Designer: Thea Dueck
(The Victoria Sampler)

Type of needlework: Cross Stitch

Photos: 2 so far

The Victoria Sampler website: http://www.victoriasampler.com/

Comments: This is a project that I have started many years ago and have not very much to show for myself. I have only worked on the first section and have not even finished it. Not quite true actually since I just saw three rows of little trees, but still not that much done on this project.

Cross stitching is not my favorite thing in the whole wide world, so perhaps that can  help explain my procrastination on this project. I should probably do a little bit at a time and it would get finished. Will see!


(What has been done so far on this project)

Thursday, October 21, 2010

Shalimar: Carol Costello, designer


(Photo of Shalimar that came with the instruction booklet)


Project: Shalimar
(WORK IN PROGRESS)

Designer: Carol Costello
(Fancy Work & Fantasies)

Type of needlework: Needlepoint

Photos: 9 so far

Comments: This is another work in progress and I am almost done with this project. Only the middle section remains.

This project is on 14-mesh tan Zweigart canvas and only needs a few different threads like Medici and Perle cotton in two different sizes.

I really need to give this one a last effort and I will end up with a lovely pillow.

(Photo 1)


(Photo 2)


(Photo 3)


(Photo 4)


(Photo 5)


(Photo 6)


(Photo 7)


(Photo 8)

Wednesday, October 20, 2010

Crazy Quilting: Garden (Work in progress)


(Crazy Quilting Garden Block
with lots more work needed)


Project: Crazy Quilting Garden (WORK IN PROGRESS)

Designer: This is a joint project with Terry

Type of needlework: Crazy quilting

Photos: 8 photos so far

Comments: Terry and I started this project many years ago.

Once finished this should represent a crazy quilt garden.

Terry has done the first part of it, embroidering different things that you typically can find in a garden. My job is to fill in all the rest, which I have not yet started. She has put quite a bit of work in it so far, so I will have to soon get cracking on this project.

If I had to redo this project all over again, I would have chosen other colors and different fabrics for my garden, but since I can't very well do this, now I will have to work with what I have. I need to put my thinking cap and see what I can do with this.

I was thinking of finishing it as a pillow once all the stitching has been completed but I still have plenty of time to change my mind at least a couple of times about this before I am done.


(beehive)

(wishing well)


(Blossom tree)


(mushrooms)


(Rustic fence)


(Willow tree)


(Squirrel)

Thursday, October 14, 2010

Kaleidoscope: An adaptation of a Sue Lentz design by Anthony Minieri for Needle Necessities

Project: Kaleidoscope

Designer: Kaleidoscope is an adaptation of a Sue Lentz design, then adapted by Anthony Minieri for Needle Necessities

Type of needlework: Needlepoint

Photos: 5 (so far) as this is a work in progress

Comments: This is a project that has been started some years back. I love the design and I think that what has kept me from completing it so far is the fact that there are lots of repeats of the same sections. I am the kind of person who loves to move along and do different things and with this design you have to do it over and over again. I swear to myself that I will complete it one day because it is really lovely, so hopefully I will get it done and sooner than later.


(Photo showing the very center of the design)


(Moving along with a bit more done)


(This photo shows the center portion completed)


(A bit more done on this one but lots more remains before completion)


I have added this last photo which came with the instructions. Unfortunately we can't see very well but it gives an idea. The piece is looks much much better than this photo.

Progress photos will be added to this blog entry when completed.