Embroideries

Embroideries

Sunday, April 24, 2011

Update: 4-way Bargello Orchid: Trivet from Sudberry House


Update:  4-way bargello Orchid


I have decided to finish this project by inserting it into a Sudberry House trivet. To see a photo, please follow this link here.

It will be the first photo at the beginning of that post.

Friday, April 22, 2011

Update: Florentine Fancywork framed


Update for Florentine Fancywork original post:


Florentine Fancywork has come back from the framer. To see a photo, please follow this link here.

It will be the first photo at the beginning of that post.

Wednesday, March 9, 2011

Floral Fantasy: Susan T. Kerndt, designer


Project: Floral Fantasy

Designer: Susan T. Kerndt

Type of needlework: Needlepoint

Photos: 3

Comments: There is a little story about these two sachets. First of all, I need to mention that my friend Terry who lives in England stitched them both.

Here is what happened. Terry stitched the first sachet (the little purple one above) and mailed it to me on December 13/2010 for this past Christmas. She was obviously running a tad late and we both wondering what was going to happen.

 We have been sending each other things for years and it normally takes from 7 to 8 days to reach us, no matter which direction it is going.

I kept checking my mailbox and there was never anything from England. Days went by followed by weeks and still nothing. We were both starting to think that it was lost and it would never arrive.  After a while Terry said to me, I am going to stitch you another one. I kept telling her "wait a bit more, we just never know". Without telling me she started a second one and she decided to change the colors a bit just in case the first one would arrive. She did not want me to have two exactly the same. She mailed that second one on February 1st, 2011.

On February 7th 2011, the first one arrived as if nothing had happened (Dec 13 - Feb 7). It took almost 2 months for the first gift to reach me.

I had talked with my mailman about the parcel not arriving and he said I was not the first one to mention something like that to him but he had not seen it and I believed him. It just happened that my husband was outside the day that the parcel from England arrived and the mailman asked my husband if that was the parcel I was waiting for. He told him "I think this is it".

My husband came back inside with the mail and I then saw something from England. I looked at him in total disbelief as I knew instantly that this was the long lost parcel. I rushed to tell Terry it had arrived but before saying anything, I told her that she better sit down first. We were both in shock but quite happy.

When I told Terry about it the second sachet had already been shipped on February 1st. We were both wondering if we would be luckier the second time around. It arrived on February 26 (Feb 7 - 26), so it took about 3 weeks to reach me.

On the other hand, everything I mailed to her continued to take about 7 to 8 days, so the problem were on my side, not hers. I had the same problem with the Australian magazine Inspiration that was held at US Customs for the longest time. My feeling is that Customs were inspecting everything more closely, perhaps due to higher security concerns during that time and a backlog was thus created. Just speculations from my part as I will probably never know for sure.

Whatever the reason(s), I am now the proud owner of two lovely little floral fantasy sachets (big grin)


This is the second little sachet


Here is a photo of them together, one was done using 18 count canvas
and the other one using Congress Cloth.

Saturday, March 5, 2011

Lee's BJ05 design to fit jewelry case: Lee's Needle Art, Inc.


Name of project: Lee's BJ05
(since I do not know the name of this particular painted design)

Designer: Lee's Needle Art, Inc.

Type of needlework: Hand painted needlepoint

Number of photos: 5

Lee's Needle Art's website: http://www.newleesneedlearts.com/

Comments: The first photo above shows the finished product including both the stitching and finishing. I even went the extra mile and added a few pieces of jewelry in order to better showcase the little jewelry case.

This was actually an impulse purchase. When I saw the design with the already chosen threads for it (sparkling), to me this looked like the perfect little traveling jewelry case. I purchased that little cutie from Pat's Stitching Destashing blog. The original owner of this project had already selected the perfect threads for it, threads from a company that I was totally unawared of before, the Renaissance Designs company and I must say that I love their metallic threads. Isn't just great when you discover something new, new to you anyway? If you want to see the different kinds of threads once on the website, you need to "Select a Category" and then you can see the different colors that they offer.


On the photo above, you can see Lee's painted canvas BJ05 with the threads that had been selected by the previous owner together with Lee's jewelry case.


Photo taken after I have completed the stitching part of it.


For those of you who may be wondering what the inside of the jewelry case looks like, I thought of taking a photo for you.


This is just another photo of the jewelry case. You can see two little jewelry separators so that you can have multiple levels and there is also a little leather strap with a snap inside the cover where you can hang some jewelry. This is very well made actually and quite practical, mostly if you are traveling and you want to bring just a few pieces of jewelry with you.

Friday, March 4, 2011

My Stitching World: A new blog

When I started this photoblog format a little over a year ago, I thought this was a great idea. Having each project in one single post. No more having to go through lots of posts in order to find everything connected with one particular project so that the entire project could be seen at a glance. What is not to like about that?

I still think it was/is a great idea, but and there is a big "but" here, just because there are so many limitations with this format, as must be obvious to all of you and should have been obvious to me too, if I had given it sufficient thought at the time. Oh well ....

I thought about it and I don't think that it is a great idea for me to change the format of my photoblog midway, so I have decided to keep it going as it is, by continuing to update it regularly with any new finished projects and to just start a new blog, which I just did and I have called it "My Stitching World". I love new beginnings with all its possibilities.

Here is the link for my new blog and I have just posted my first post a little while ago telling you a bit how I see things to come and I hope you will join me. Hope to see you all there!

Pierrette =^..^=

Saturday, February 19, 2011

The Dodecagon Series designed by Jim Wurth


This is another series that I thought would be useful to be able to see them all in one place.


The Dodecagon Series consists of twelve 12-sided designs each five inches in diameter and all uniformly shaped that were created by Jim Wurth of Wurthwhile Stitching.

Like I have done for such similar group postings before, there will be a link under each photograph so that if you are interested in reading more about one individual ornament and/or see additional photos, all you have to do is click on the link under each individual photo and it will bring you to the original posting.

Since I know how well these ornaments have been popular I am including herewith all the necessary information so that if you are interested in stitching them, you will know who to contact.

(Before I go any further I would like to mention that I have absolutely no vested interest in this designer or any other designers mentioned on my blog - I only do this in order to help both designers and stitchers)

Jim Wurth email address is as follows and he can be contacted at this address: JWurth@msn.com
Jim has a Yahoo group that has been created expressly for the Dodecagon Ornament Series and Jim is there to answer questions, but this is not an online class. Link for Jim's Dodecagon Ornament Series Yahoo group is here

Now for those of you who are wondering where these ornaments are being sold, here is a bit of information for you all.

There is one needlepoint shop that exclusively sells these designs and it is Threadneedle Street located in California and here are the contact details in case some of you might be interested:

Marianne Bergson, Owner
Threadneedle Street
75-645 Dempsey Drive
Palm Desert, CA 92211

(760) 340-0411

email: threadst@aol.com


So, here are the photographs of each ornament in the order they were sent to me for stitching.


First ornament of this series: Coronation

For more information, please follow this link.


Second ornament of this series: Mojave

For more information, please follow this link.


Third ornament of this series: Poirot
For more information, please follow this link.


Fourth ornament of this series: Monrovia

For more information, please follow this link.


Firth ornament of this series: Hearts and Flowers

For more information, please follow this link. 


Sixth ornament of this series: Arcadia

For more information, please follow this link.


Seventh ornament of this series: The Baroness Edie

For more information, please follow this link.


Eight ornament of this series: Czarina
For more information, please follow this link.


Ninth ornament of this series: Camelot

For more information, please follow this link.


Tenth ornament of this series: Old Country

For more information, please follow this link.


Eleventh ornament of this series: Peace Tree
For more information, please follow this link.


Twelth ornament of this series: Fabulous Finale

For more information, please follow this link.

Wednesday, February 16, 2011

Carole Lake's Glitzy Stitching Accessories


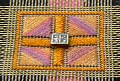
This is my name tag, as if anyone needed a reminder (smiling).
I love it.

For more information, please follow this link.

==================================

I was thinking the other day, an activity that sometimes can be dangerous to my own health, that it might be quite interesting to be able to see all the Glitzy Stitching Accessories that Carole Lake designed some years back together in one single place and not have to hunt them down here and there on my blog.

Under each stitching accessory I will give you the link where the original posting has been made so that if you want to know a bit more about each one or see additional photos, all you have to do is click on the link and presto you will be there.

This is an online class I took with Carole many years ago, at a time when there were not that many classes on the internet, unlike today when we have lots and lots of options available to us. For clarification purposes, I did not take that class because there was not anything else available to me at the time as I would have taken it no matter what. There was also a very strong incentive at the time for learning how to do the finishing. I must say that I have learned quite a bit with that series and even today I often refer to the instruction when I find myself in a special spot of bother and just can't remember exactly how I did this or that.

The only change I made with this project is a change of threads and canvas colors. Carole used reds and blues mainly for her Glitzy Stitching Accessories and I am rather partial to colors like coppers, gold and blue/greens, so when I went shopping I checked to see what was available in those colors.

================================


This is my laying tool case

For more information, please follow this link.

=======================================


This is my scissor fob

For more information, please follow this link.

=====================================


Photo of my needle case closed


Photo showing the backside of my needle case when completely opened.

For more information, please follow this link.

======================================


This one is my scissor case.

For more information, please follow this link.

===========================================


This one is my frame weight.

I would like you to guess what I have put inside to give it some weight.

Anyone, any ideas?

If I say that no matter what happens to me I will  never be pennyless, would that ring a bell?

Right, I have put pennies inside, brand new ones too (big grin)

For more information, please follow this link.

=================================

For those who may be interested in stitching these, here is a link where you can find them and have a go at picking up your own colors.

Monday, February 14, 2011

Happy Valentine 2011


H A P P Y   V A L E N T I N E

I was wondering what I could add to my blog for this Valentine as I have not stitched any new hearts lately and thought it could be fun to see the few hearts I have stitched so far all in one place.

I have a couple that are useful to my stitching and a couple that are just decorative.


The pink heart above is called Victorian Heart Pincushion and as his name implies it is a lovely pincushion. I must confessed though that even if it could be something to stitck needles in, I find it too lovely to do so and have so far kept it as a little decoration.

For more information please follow this link.
============


This little heart is called  Here's My Heart Scissor Sheath and contains a little pair of scissors.
For more information please follow this link.

==============


This very special heart is called Windows Into My Heart.
For more information please follow this link.

===============


The last heart that has been stitched so far is called Patriotic Heart.
For more information, please follow this link.

==============


I had almost forgotten about this Crazy Quilt Heart I made some time ago.
For more information, please follow this link.

=====================================


This little heart, I had completely forgotten until my good friend Terry who actually made it for me for one past Christmas, reminded me of my little omission (big grin).
For more information please follow this link.

================================
Hope that you all have a lovely day!

Pierrette =^..^= 

Sunday, January 30, 2011

Project Update: Orna's needlecase

UPDATE
on initial posting dated 01/15/2011


I have just completed Orna's needlecase project and I have added a couple of additional photos on my original blog post. You can see them here.

Wednesday, January 19, 2011

Seeds of Love bookmark: An adaptation of a Brenda Ryan design


Project: Seeds of love bookmark

Designer: This is an adaptation of a design by Brenda Ryan
(Inspirations Magazine issue 51 for the design
and issue 50 for the bookmark style)

Type of Needlework: Embroidery

Photos: 2

Comments: When I was looking for something useful and pretty to make for a friend of mine, the idea of a bookmark came to mind since she loves to read when she is not stitching, cooking, gardening, working and so on. Once I had decided on a bookmark for her, my next decision was what to stitch on it. I then remembered a little fabric envelope that I had stitched a while back with the cute little flowers, which seemed perfect.

Here is the link of that project.

For those who may be wondering what is the title of the book below, it is called "Embroideries from an English Garden by Carol Andrews" (projects and techniques in surface embroidery). I have not yet stitched anything from that book, but it is definitely on my list of things that I want to stitch. There is no connection between my little bookmark and the book. It just happened to be close by when I took the bookmark photo and the colors went well together (big grin).

Making this little bookmark gave me additional ideas for adapting Brenda Ryan design to other little projects.