Embroideries

Embroideries

Saturday, July 31, 2010

Gold and Burgundy Ornament: Gay Ann Rogers, designer


Project: Gold and White Ornament
(In my case it is Gold and Burgundy Ornament)

Designer: Gay Ann Rogers

Type of needlework: Needlepoint

Photos: 2


Shining Needle Society: http://www.shiningneedlesociety.com/

Comments: Gay Ann created this little ornament to celebrate her new website a while back.

This is different from what I have done as it is stitched on "perforated paper". I had heard about stitchers using this medium before but had never tried it myself, so decided that it was the perfect occasion to do so.

It has its advantages and disadvantages. One advantage was that I could just hold it in my hand while stitching it, something that almost never happens when I am stitching something, so that was nice. The finishing was very easy to do and quick.

What I did not really like was the fact that it was done on perforated paper. Maybe I am a stitching snob, but I prefer using the "real" thing. I am also not overly crazy using Aida but I have used it at times quite successfully, so it all depends on what I want to do.

In ending, I am glad that I have tried it but I don't think that I will use perforated paper in the future, but hey we never know and will keep an open mind about it.


(Photo showing the stitched ornament before adding the back to the front)

If I remember correctly I had to under the last long gold stitches as those were the ones that held the front and back together, but that was no big deal and did not take long to undo and redo once the back was under the front.

For the loop, I have use some pretty gold "kind of elastic", you know the ones they sometimes put to hold a box of chocolate closed. It seems ideal as it keeps its shape and looks like a ring.

Friday, July 30, 2010

Christmas Tree ornament


Project: Christmas Tree ornament

Designer: My friend Terry made this

Type of needlework: Mixed media

Photos: 2

Comments: This ornament is just so typical of my friend Terry. She often says that she fly by the seat of her pants. She gets an idea in her head and then proceed to work on it and hope for the best. Just writing this makes me smile.

So, one day, years ago, before one of our Christmas gift exchange, she realized that time was running out and that she needed to make something more and quickly too and she came up with this little ornament.

Every Christmas it finds itself among my tree decorations and each time I think of her.

(Photo showing the back)

Thursday, July 29, 2010

Keyboard Pencil Holder


Project: Keyboard Pencil Holder

Designer: Can't recall at all

Type of needlework: Needlepoint

Photos: 2

Comments: I have stitched many of those for the local Guild many many years ago and also stitched one for myself while at it.

I think it is rather cute and also useful. I have a piano and been keeping mine there with a few pencils since the time it was made.

I don't remember much details about it except that it was made with plastic canvas and some thick wool threads like the one someone can use for knitting. After stitching the front (photo above) and the back which was all black, all I had to do is stitch the back with the front and I was done. I may have made 10 or 12 of these little buggers for them. The pattern was rather simple and the stitching could be done without having to pay very close attention to it.


(Photo showing the keyboard pencil holder with some inside)

Wednesday, July 28, 2010

Sachet from Jill


Project: Sachet

Designer: Jill made this for me

Type of needlework: Mixed media

Photo: 1

Comments: When Jill made me the lovely angel here, she also made me this little sachet accompanied by a lovely bottle of perfume so that I could add a few drops whenever the smell had evaporated from the sachet. I thought it was a really lovely gesture.

This is something that is easy to make and the recipient can just put the little sachet in a drawer. One scent that I particularly love is the smell of lavender.

Tuesday, July 27, 2010

Honeybee Hive


Project: Honeybee Hive

Designer: My friend Terry made this for me

Type of needlework: Embroidery

Photos: 2

Comments: Terry and I have been having this ongoing joke about little bees and one day she surprised me with this little card that she created herself. I think it is darling and it makes me smile every time I look at it thinking of our little private joke.

(Closeup photo)

Friday, July 23, 2010

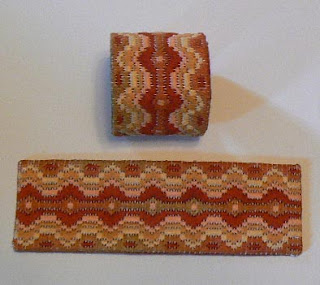
Napkin Rings: Brenda Day, designer


Project: Napkin Rings

Designer: Brenda Day

Type of needlework: Bargello

Photos: 5

Brenda Day's book called: Bargello, A fresh approach to Florentine embroidery

Comments: It is very rare that I do more than one project from one single book, but with this book, I have already done the two napkin rings (photos above and below),  a Florentine pincushion, which in my case is a little decorative mini pillow and 2 Kaleidoscope coasters, so that must be a record for me.

This is a project that did not take very long to make from start to finish and since I love doing bargello, this was especially fun for me. I especially love to do projects that are useful and this one certainly is.

There was two color selection for the napkin rings and I picked one that I especially love. The other one has greens in it, but of course someone can do any color combination that they wish.

Finishing instructions are always included with all her projects making things much easier for me to do my own finishing. I have included a few photos showing different steps I went through.


(Photo of two stitched napkin rings)


(This photo shows the front and the back of two napkin rings)


(Photo showing one napkin ring completed with the second one waiting in the wing)


(Brenda Day's book from which this project was taken from)

Wednesday, July 21, 2010

Hearts to Hold Tussie Mussie: Annaliese Noel, designer


Project: Hearts to Hold Tussie Mussie
(1996)

Name of designer: Annaliese Noel

Type of needlework: Needlepoint and Beading

Photos: 4

Comments: At the moment I saw this design, I knew that I wanted to stitch it. It is just so beautiful and delicate.

In her project description, Annaliese Noel says the following "Hearts to Hold is a gentle reminder of another time. Fill it with potpourri and hang it to scent a corner, a light or a closet, or fill it with holiday greens and berries for a Victorian Tree Ornament".

This was not a difficult project to stitch but I had to be careful about counting and tracing the outline properly on the back of my stitching once it had been completed. All the time I was stitching this Tussie Mussie, I was thinking that this could also look fantastic as a fan project.

All the instructions for assembly and finishing were also included so I was able to do this project from start to finish.

I used some lovely silk dupioni fabric for the inside lining, created a tassel and threaded a crystal matte bead and a lovely carved crystal heart bead and attached everything at the very bottom of the Tussie Mussie.

I also made a small twisted cord that I attached around the top opening of the Tussie Mussie and also made a little hanger which you can see in one of the close-up photo below.

(Close-up photo)


(Another close-up taken sideway, showing the little hanger too)


(Photo showing the stitching completed before assembling)

Sunday, July 18, 2010

The Morning After: Anne Stradal, designer


Project: The Morning After
(Painted canvas)

Designer: Anne Stradal

Type of needlework: Needlepoint on painted canvas

Photos: 4


Comments: This was a fun project. I have pretty much stitched mine just like Anne stitched hers, making just a few changes here and there but nothing drastic. You can see Anne's Santa here and compare the two.

I did my own finishing on this project like I very often do. I wanted this project to be finished like a family portrait just like the ones you put in a frame and put on a desk somewhere in your house. I found just enough of a velour type fabric that had just the right shade of green that I needed and finished the back with it. Once that was done I added a red cording all around the frame and then made the little flap/stand to hold the picture upright that you can see on the back in the photo below..
(Back of my little photo frame)


(On this photo you can see both the front and the back before I put the two together)

(Photo taken just after all the stitching had been completed)

Saturday, July 17, 2010

Crazy Quilt Memory Pillow


Project: Crazy Quilt Memory Pillow

Designer: My friend Terry made this for me

Type of needlework: Crazy Quilting

Photos: 12

Comments: This is the second Crazy Quilting pillow that Terry made for me. This one is a Crazy Quilting Memory Pillow. In order for her to make this one, I had to send her a bunch of photographs that I particularly liked. She printed the ones she needed for the pillow in black and white for uniformity and attached them on the pillow.

Terry has been embellished each photograph, also adding a couple of trees as she knows how crazy I am about them as well as charms, etc. This is what is fun with crazy quilting, you can go a bit crazy with it, if you feel like it.

At the very end of this blog entry, you can see both pillows side by side on one of the couch in the TV room where we spend quite a bit of time. Terry decided on the colors for the pillows after I had sent her a photo of the couch. I think that she did a terrific job and I have been enjoying them both ever since.


(First close-up)


(2nd close-up)


(3rd close-up)


(4th close-up)


(5th close-up)


(6th close-up)


(7th close-up)


(8th close-up)


(9th close-up)


(Pillow completed before inserting the pillowform)


(The two pillows side by side)

Monday, July 12, 2010

Crazy Quilt Pillow


Project: Crazy Quilt Pillow

Designer: My friend Terry made this lovely pillow for me

Type of needlework: Crazy Quilting

Photos: 6

Comments: A few years back when Terry and I were involved in Crazy Quilting, she made this lovely pillow for me. Some close-up photos have included showing various sections of the pillow in more details.


(Photo showing top left of pillow)


(Photo showing top right of pillow)


(Photo showing bottom left of pillow)


(Photo showing bottom right of pillow)


(Photo showing completed pillow before adding the pillowform)

Friday, July 9, 2010

Postcards received


Projects: Postcards

Designers:

Type of needlework: Mixed Media

Photos: 3

Comments: These three postcards were received as part of group exchanges that I participated in. The first one above is a special Victorian Valentine postcard made by Terry W.

Photos of some I have made myself and given away:  Dracula Spider, Under the Sea
This postcard (above) was made by Elaine E. and had a more modern appearance.


Finally, this third one is an underwater scene made by Terry W.

Thursday, July 8, 2010

Artistic Trading Cards received during exchanges


Project: Artistic Trading Cards received during exchanges

Designers: Names under each ATC whenever I could find identification
which is all except one person

Type of needlework: Mixed media

Photos: 5

Comments: I have recently found in my treasure box some Artistic Trading Cards received during various exchanges done in the past and I thought it would be fun to put them on my blog. I took group photos and identified most of the ATC makers. Sorry about the one that I could not do so.
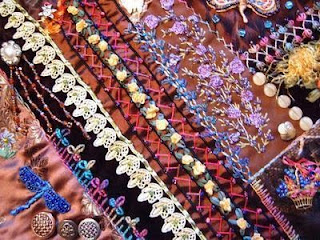
The first two photos above show the front and the back of an ATC made by someone that I unfortunately can't identify anymore. I should have written her name down.


From left to right with middle ones included starting with the upper one: Denise C., Mireille V., Terry W.,
Denise C., Elaine E.


From left to right, by rows starting with the left one above: Mary J.T., Mary J.T., Darsie B., Linda F.

From left to right, by rows starting with the left one above: Linda L., Terry W., Denise C., Juliette C.

Links of Artistic Trading Cards I have made and given away: Guardian Angel, Dancing Queen, Halloween ID Card, Little Clown

Wednesday, July 7, 2010

Pansy Lady Crazy Quilting Needlebook


Project: Pansy Lady Crazy Quilting Needlebook

Designer: Original design from Peggy White

Type of needlework: Crazy Quilting

Photos: 6

Comments: This project was originally designed for a pouch, but I thought that I would probably never use it so I turned around and made a needlebook instead with the design.

There was a little kit coming with this project, a fabric image of lady with pansies, a ribbon pansy, some hand dyed silk ribbon, some silk threads. I looked around in my stash for some fabric and came up with what you can see in the photos. I have also made other contributions to the final arrangement.

I have always enjoyed this needlebook as this is my biggest one size wise and I have been using every bit of space in it during the past years. I do have approximately 6 needlebooks at this time.  I have made quite a few others but have given them away either as gifts to friends or as part of some exchanges.


(Naked Block)


(After stitching)


(Photo showing pansy section close-up)


(Close-up of tree and flowers)


(Close-up of the fabric image of lady with pansies)