Embroideries

Embroideries
Showing posts with label Gay Ann Rogers. Show all posts

Monday, September 20, 2010

The Guardian Angels of Hollyhock House: A Gay Ann Rogers' design

Project: The Guardian Angels of Hollyhock House

Designer: Gay Ann Rogers

Type of needlework: Needlepoint

Photos: 12 (so far)

Comments: This is a rather big project. The congress cloth used measures 18 1/2" wide by 24 1/2" long. Threads used are mostly Soie d'Alger (a 7-ply silk) together with a few other threads. There are 145 pages of instructions.

You will see photos of what I have stitched so far.

There are two pots of hollyhocks, one on each side of the house.


Close-up of upper section


Close-up of lower section


Photo showing one pot of Hollyhocks completed and the second one incomplete


Two pots of Hollyhocks completed and the beginning of the laying of the bricks.
We can see the mortar on each side of the house.


Beginning of the laying of the bricks

Additional bricks have been stitched


Left side of the house has the laying of bricks completed


Starting the brick laying on the right side


Bricks all done

Roof has been completed with the two chimneys

Photo showing what has been stitched so far

Future postings will be added to this blog entry when available.

Monday, August 2, 2010

Patriotic Heart: Gay Ann Rogers, designer


Project: Patriotic Heart

Designer: Gay Ann Rogers

Type of needlework: Needlepoint

Photos: 6


Shining Needle Society: http://www.shiningneedlesociety.com/

Comments: Gay Ann has a series of little hearts that she has been designing through the years and this is the first one of hers that I have stitched so far.

I have quite a few more waiting in the wings, all absolutely lovely.

For the finishing, I decided to do a "hard" one as I wanted the heart to keep its shape. With a soft one, it would not have been the case.

A few things that I want to say is that I have many finishing books but have not been able to find instructions as to how to finish a heart this way.

I found some instructions for a soft one, which I immediately discarded, another one with a heart opened at the top for someone who wants to put something inside, a bit like an open stocking, but did not want that either, so I had to use the little bit of experience I had in finishing to make this happen.

Because of the shape, I had a little bit more problems than I normally have. I have been wondering why nobody has thought of showing us how to properly finish a heart the "hard way" and not just the "soft way" as I was able to find finishing for all sorts of things I had not even thought about. Lots of good ideas for future projects but none to help me with this current one.

I have put two layers of padding on the front of the heart and only one on the back. Have found some blue silk dupioni silk for the back, the same color as the thread used for the stitching, so used that. Had never made a cording before that looked like a candy cane but with three colors instead of two, so there was a bit of trial and error there, but finally managed to put something together. I decided to use the same cording and make a bow and then undid the lower part of the cording to give it the look that you can see in the photo. My learning curve has gone up a little with this project, which is what I always want to see happening

After having done the finishing on this project, I realized that I only have ONE item to finish and I am done. Everything that I have ever stitched has either been framed by my framer or finished by "little old me" (grinning). That is a great feeling actually. While I was looking at all my finishing books, I got an idea as to how to finish the last one. Hush, hush on this one, you will have to wait and see (grinning even more). 

(Photo showing the beginning of this project)

(This photo shows a nice progression)

(A bit more done here)

(Patriotic heart having been stitched)


(Another photo showing the finished Patriotic Heart)

Saturday, July 31, 2010

Gold and Burgundy Ornament: Gay Ann Rogers, designer


Project: Gold and White Ornament
(In my case it is Gold and Burgundy Ornament)

Designer: Gay Ann Rogers

Type of needlework: Needlepoint

Photos: 2


Shining Needle Society: http://www.shiningneedlesociety.com/

Comments: Gay Ann created this little ornament to celebrate her new website a while back.

This is different from what I have done as it is stitched on "perforated paper". I had heard about stitchers using this medium before but had never tried it myself, so decided that it was the perfect occasion to do so.

It has its advantages and disadvantages. One advantage was that I could just hold it in my hand while stitching it, something that almost never happens when I am stitching something, so that was nice. The finishing was very easy to do and quick.

What I did not really like was the fact that it was done on perforated paper. Maybe I am a stitching snob, but I prefer using the "real" thing. I am also not overly crazy using Aida but I have used it at times quite successfully, so it all depends on what I want to do.

In ending, I am glad that I have tried it but I don't think that I will use perforated paper in the future, but hey we never know and will keep an open mind about it.


(Photo showing the stitched ornament before adding the back to the front)

If I remember correctly I had to under the last long gold stitches as those were the ones that held the front and back together, but that was no big deal and did not take long to undo and redo once the back was under the front.

For the loop, I have use some pretty gold "kind of elastic", you know the ones they sometimes put to hold a box of chocolate closed. It seems ideal as it keeps its shape and looks like a ring.

Saturday, June 19, 2010

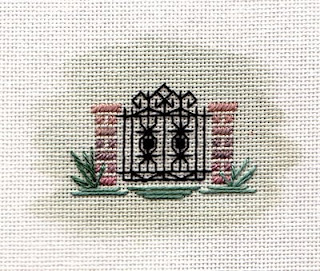
Miniature Garden Gate: Gay Ann Rogers, designer


Project: Miniature Garden Gate

Designer: Gay Ann Rogers

Type of needlework: Needlepoint

Photos: 2


Shining Needle Society: http://www.shiningneedlesociety.com/

Finishing forms used for this project can be found here.

Comments: After having stitched the lovely miniature Georgian House, I went ahead and stitched the miniature Garden Gate.

The finishing is so easy to do with those metal finishing forms. I don't use them all the time. It really depends on the end result I am striking for. In this case I thought it would work very nicely.

This photo below shows the two little ornaments side by side.


Friday, June 18, 2010

Miniature Georgian house: Gay Ann Rogers, designer


Project: Miniature Georgian House

Designer: Gay Ann Rogers

Type of needlework: Needlepoint

Photo: 1


Shining Needle Society: http://www.shiningneedlesociety.com/

Comments: I thought it would be fun to stitch this cute little miniature Georgian House and finish it as an ornament and put on my Christmas tree during the holidays.  This was also really a quick stitch. We all need little projects like this one from time to time to do between bigger and more time consuming ones.

In case you are wondering, there was a bit of green paint applied on the canvas by Gay Ann before I did any stitching. This gave me some ideas for future projects as it seems rather easy to do really.

I am full of ideas. I just wish I had more time to work on them all. I do think that each project teaches me something and better prepare me for the one that follows.

In a following post, you will see the accompanying one which is a miniature garden gate which also had a bit of paint applied on the canvas by Gay Ann. The two of them together  make a nice little set.

Wednesday, June 16, 2010

End-of-Term Examination Ornament: Gay Ann Rogers, designer


Project: End-of-Term Examination ornament

Designer: Gay Ann Rogers

Type of needlework: Needlepoint

Photos: 5


Shining Needle Society: http://www.shiningneedlesociety.com/

Comments: Well, it seems that Gay Ann wanted to give us a little test in order to find out if we had learned anything at all with our Mystery in a Corner so she had this little ornament for us to stitch in any colors that we wanted.

Since I had left over threads from Mystery in a Corner, I thought that I might as well used them, but this little design would look great in Christmassy colors too or any colors that someone wants to use.

I still had the same objective as I have had with Mystery in a Corner, still rooting for BLUE and fighting green at every corner.

I did the finishing of this little ornament using the book called Sandy's Finishing Touches.  I must say that I consider this book my finishing bible. I have other books on finishing but I always seem to go back to this one. I just feel comfortable with it.


(First photo taken showing the first few steps of this ornament)

(Concentrating on adding BLUE here)

(I love that bit of range with it. Makes it look alive)

(Ornament all stitched up and ready for finishing)

Tuesday, June 8, 2010

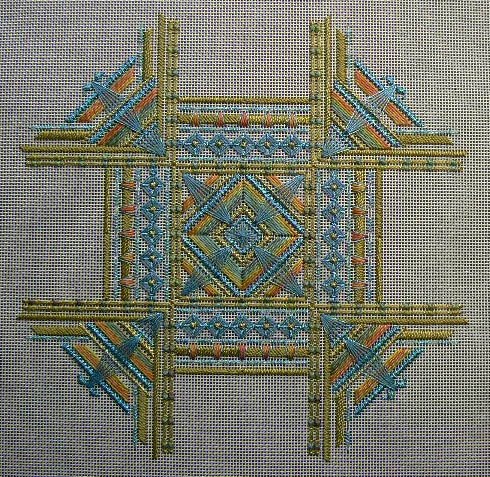
Mystery in a Corner: Gay Ann Rogers, designer


Project: Mystery in a Corner

Designer: Gay Ann Rogers

Type of needlework: Needlepoint

Photos: 34


Shining Needle Society: http://www.shiningneedlesociety.com/

Comments: One of the goal for Gay Ann Rogers in her Shining Needle Society classroom when she suggested  Mystery in a Corner for our collective project was to help us learn a bit more about colors.

At first, I resisted that new project mainly because I already had so many different projects in progress and lots more waiting in the wings, but after giving it quite a bit of thought, I decided to go ahead and participate because as I said before it had been designed to help us with color decisions, something that I can always learn more about.

The first decision I had to make was to choose the colors. I selected Woodlands as my Watercolour and then Pam from Tomorrow's Heirlooms picked up the additional threads to make my special combination. I thus ended up with the following colors: greens, blues, topaz with my already selected Woodlands Watercolours.

There is a lot of photos in this blog entry as one of my goal while doing this project was to end up with a visual documentation of what actually happens when I put a certain color next to another one. I have found fascinating to see the impact that each successive colors had on the previous ones.

Once I got all my colors in front of me, then I realized that although I liked all the colors, I prefered the blue, so during all the days that I stitched on this project I was there rooting for BLUE. I wanted BLUE to win over the other colors. Some days it seemed that things were going my way and on other days, they were not, so I kept stitching until they were going my way (grinning).

(My thread selection: My Watercolor selection done from some Waterlilies threads I had at home. Interestingly
enough there seemed to have had more blue in it than the actual Watercolor. I do love that green but that blue
 really appeals to me )

(From here on there will be a succession of photographs showing all different steps.
On this one I just love to see all that BLUE)

(BLUE followed by Topaz)

(Some Watercolor added with some orange tints)

(BLUE is winning here)

(BLUE still doing good)

(BLUE looks great but there is lots of green too)

(Lots of green. Where is my BLUE?)

(WOW, Lovely BLUE)

(Even more BLUE here)

(Let's bring all that BLUE)

(Green added but can still see lots of BLUE)

(Still happy with my BLUE)

(Looks like a mixture of BLUE and green here)

(OUPS, getting greener and greener here)

(Even  more green - where it my BLUE?)

(Things are not getting any better)

(Oups, a tiny bit of additional BLUE)

(Topaz added after my little bit of BLUE)

(Love the BLUE)

(A tiny bit more BLUE)

(Adding a bit of Watercolor with a bit of orange in it)

(Adding a bit more BLUE)

(NOW we are talking, more BLUE that we can really see)

(A bit more BLUE)

(YOUPPEE, more BLUE)

(Things are really going well, MORE BLUE)

(Oups, a bit of green)

(We can barely see the additional BLUE here)

(Green added)

(Lots of green but I can still see some nice BLUE too)

(Well that is ONE way of adding BLUE with a BLUE MAT)

We now have a BLUE Mat but with a green frame
Oh well, that is what we call making a "Compromise"