Embroideries

Embroideries

Sunday, October 24, 2010

Jingle Bells Xmas Tree Farm: Thea Dueck, designer


(Photo that came with instructions)


Designer: Thea Dueck
(The Victoria Sampler)

Type of needlework: Cross Stitch

Photos: 2 so far

The Victoria Sampler website: http://www.victoriasampler.com/

Comments: This is a project that I have started many years ago and have not very much to show for myself. I have only worked on the first section and have not even finished it. Not quite true actually since I just saw three rows of little trees, but still not that much done on this project.

Cross stitching is not my favorite thing in the whole wide world, so perhaps that can  help explain my procrastination on this project. I should probably do a little bit at a time and it would get finished. Will see!


(What has been done so far on this project)

Thursday, October 21, 2010

Shalimar: Carol Costello, designer


(Photo of Shalimar that came with the instruction booklet)


Project: Shalimar
(WORK IN PROGRESS)

Designer: Carol Costello
(Fancy Work & Fantasies)

Type of needlework: Needlepoint

Photos: 9 so far

Comments: This is another work in progress and I am almost done with this project. Only the middle section remains.

This project is on 14-mesh tan Zweigart canvas and only needs a few different threads like Medici and Perle cotton in two different sizes.

I really need to give this one a last effort and I will end up with a lovely pillow.

(Photo 1)


(Photo 2)


(Photo 3)


(Photo 4)


(Photo 5)


(Photo 6)


(Photo 7)


(Photo 8)

Wednesday, October 20, 2010

Crazy Quilting: Garden (Work in progress)


(Crazy Quilting Garden Block
with lots more work needed)


Project: Crazy Quilting Garden (WORK IN PROGRESS)

Designer: This is a joint project with Terry

Type of needlework: Crazy quilting

Photos: 8 photos so far

Comments: Terry and I started this project many years ago.

Once finished this should represent a crazy quilt garden.

Terry has done the first part of it, embroidering different things that you typically can find in a garden. My job is to fill in all the rest, which I have not yet started. She has put quite a bit of work in it so far, so I will have to soon get cracking on this project.

If I had to redo this project all over again, I would have chosen other colors and different fabrics for my garden, but since I can't very well do this, now I will have to work with what I have. I need to put my thinking cap and see what I can do with this.

I was thinking of finishing it as a pillow once all the stitching has been completed but I still have plenty of time to change my mind at least a couple of times about this before I am done.


(beehive)

(wishing well)


(Blossom tree)


(mushrooms)


(Rustic fence)


(Willow tree)


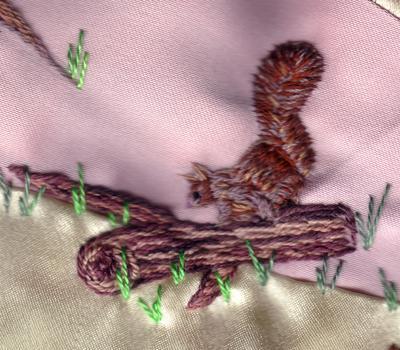
(Squirrel)

Thursday, October 14, 2010

Kaleidoscope: An adaptation of a Sue Lentz design by Anthony Minieri for Needle Necessities

Project: Kaleidoscope

Designer: Kaleidoscope is an adaptation of a Sue Lentz design, then adapted by Anthony Minieri for Needle Necessities

Type of needlework: Needlepoint

Photos: 5 (so far) as this is a work in progress

Comments: This is a project that has been started some years back. I love the design and I think that what has kept me from completing it so far is the fact that there are lots of repeats of the same sections. I am the kind of person who loves to move along and do different things and with this design you have to do it over and over again. I swear to myself that I will complete it one day because it is really lovely, so hopefully I will get it done and sooner than later.


(Photo showing the very center of the design)


(Moving along with a bit more done)


(This photo shows the center portion completed)


(A bit more done on this one but lots more remains before completion)


I have added this last photo which came with the instructions. Unfortunately we can't see very well but it gives an idea. The piece is looks much much better than this photo.

Progress photos will be added to this blog entry when completed.

Monday, September 20, 2010

The Guardian Angels of Hollyhock House: A Gay Ann Rogers' design

Project: The Guardian Angels of Hollyhock House

Designer: Gay Ann Rogers

Type of needlework: Needlepoint

Photos: 12 (so far)

Comments: This is a rather big project. The congress cloth used measures 18 1/2" wide by 24 1/2" long. Threads used are mostly Soie d'Alger (a 7-ply silk) together with a few other threads. There are 145 pages of instructions.

You will see photos of what I have stitched so far.

There are two pots of hollyhocks, one on each side of the house.


Close-up of upper section


Close-up of lower section


Photo showing one pot of Hollyhocks completed and the second one incomplete


Two pots of Hollyhocks completed and the beginning of the laying of the bricks.
We can see the mortar on each side of the house.


Beginning of the laying of the bricks

Additional bricks have been stitched


Left side of the house has the laying of bricks completed


Starting the brick laying on the right side


Bricks all done

Roof has been completed with the two chimneys

Photo showing what has been stitched so far

Future postings will be added to this blog entry when available.

Wednesday, September 15, 2010

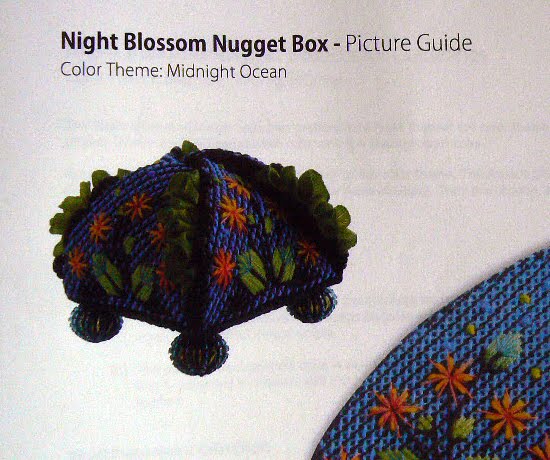
Night Blossom Nugget Box: Debbie Deem designer


Project: Night Blossom Nugget Box

Designer: Debbie Deem of StitchArtz

Photo: 1

Debbie's website: http://www.stitchartz.com/


Comments: I remember when I first read about this little project on one of the blog that I read on a regular basis that I thought this was a really cute little project and that it would be fun to stitch it. I love boxes of all sizes and this one was quite original. It still is.

On January 30th of the year 2009, I paid my $75.00 to Stitchartz through Paypal so that I could participate in that online class. It was going to be a 10 week on-line class scheduled to start on March 15, 2009.

There was a painted canvas that I was due to receive for the beginning of that class. I did receive it on March 23, 2009, beautiful colors as I had chosen "Midnight Mist". I started Debbie's "orientation online class" on March 28 of 2009.

I, along with the other participants in the class, received the first 4 lessons of this project, the last one being on October 19, 2009 and that was the end of what I have received up to now and we are now September 15, 2010. There was a forum in which we could communicate with the teacher, but I can't access it anymore. It may have gone or is just inaccessible to me/us, not sure which one of the two.

As of this morning there are still 169 students in that class and we are all in LIMBO, not really knowing if we will ever be able to complete this project or not as we have not heard from Debbie Deem in months.

I personally have never requested my money back as I was and still am hoping that we will receive the lessons that we have never received and have a happy ending to this deplorable situation. I may be over optimistic here, but hey we never know.

I know that I am in good company here since we are still 169 students in that class patiently waiting and hoping that Debbie will be back one of these days (sooner rather than later) with the rest of our lessons for NIGHT BLOSSOM NUGGET BOX and perhaps she will also make some kind of amends to all of us. We sure deserve something for being so darn patient.

Sunday, September 5, 2010

Have a Purrfect Christmas


Project: Have a Purrfect Christmas

Designer: Unknown to me

Type of needlework: Cross Stitch

Photo: 1


Comments: Here is a cute little cat ornament that has the words "Have a Purrfect Christmas" stitched on his tummy. The design is called "Purrfect" Christmas. He measures approx. 7 inches tall with his tail curled up. There is a small jingle bell hanging just below the bow.

Purchased from Janet Lange on eBay and stitched by herself. She said that she stitched it from a magazine pattern but can't recollect which one.

Wednesday, September 1, 2010

Bead Scissor Fob


Project: Bead Scissor Fob

Designer: Can't remember

Type of needlework: Beading

Photo: 1

Comments: One of my friend is always on the lookout for some scissor fob, so when I saw this one, I made it for her. Simple enough, some beads and a little tassel, but rather cute.

Monday, August 30, 2010

Halloween ornament


Project: Halloween Ornament

Designer: My friend Terry

Type of needlework: Embroidery

Photos: 2

Comments: Another little ornament that was made by my friend Terry on the spur of the moment as she knows that I always have so much fun making them myself too, so she thought of surprising me with one and she did.

The broom is also our way of transporting each others from America to Europe and vice versa, so not sure if the witch if her or myself. It could actually be either of us (grinning). I love little gifts that have special meaning.


Monday, August 16, 2010

Christmas Crazy Quilting Block

Project: Christmas Crazy Quilting Block
WORK IN PROGRESS

Designer: Something that I am creating

Type of needlework: Crazy Quilting

Photos: 10

A great resource for Crazy Quilters: http://www.pintangle.com/

Comments: This is an unfinished project which I really want to complete. I have chosen a Christmas theme for this Crazy Quilting block as I thought it might inspire me to do something special as I love that time of the year.

First thing I had to do was to find some pieces of fabric that were Christmassy and went well together and then decide on how I was going to put the different pieces of fabric together. The first photo below shows the naked CQ block.

(Photo of naked block)

Then, I picked some lace and trims that I particularly liked and added them to my naked block. This second photo below shows the three I have selected for this purpose.

(Photo showing the first 3 additions)
I then proceeded in stitching two seam treatments which you can see on the third photo below. I have added a close-up photograph of those two seam treatments.

(Photo showing two embroidered seam treatments)

(Close-ups)

When I started this Christmas CQ block I had in my possession a lovely policeman that I wanted to use for this project. I have also embroidered the word "Noel" and added another seam treatment. A few close-up photos have been included below.

(Embroidered the word "Noel" and also added the policeman)

(Close-up for Noel)

(Policeman close-up)

Continuing with my Christmas theme I decided to embroider a reindeer which you can see on the photo below. I did not have room to do an entire one so just went with a reindeer head. There is also a close-up photo below for the reindeer.

(Embroidered a reindeer)

(Reindeer close-up)

This last photograph shows the work that has been done so far on this project. I now need to have a good thinking session to see what else I can add to this Christmas block that would look great.

I will add successive photos on this blog entry.

(Photo showing all the work done so far on this Christmas block)