Embroideries

Embroideries

Sunday, June 13, 2010

Winter Frost: M. Lashley-Liston, designer


Project: Winter Frost
(1996)

Designer: M. Lashley-Liston

Type of needlework: Needlepoint

Photos: 3

This design can be seen here on the ANG website

Comments: When I saw this project, I immediately wanted to stitch it as I just loved the elegance of its design and the stitches used.

If you are wondering what kind of blue shade the canvas for this project is,  it is Leviathan blue. This project also only needed a few different threads and beads.

I started by stitching the first two steps shown on photos below and then the following three steps, I more or less followed the directions given when decorating my tree but not entirely, so there are some differences between mine and the one stitched by the designer, which an observant eye can see by following the ANG link above and looking at the original.

In order to couch the different ribbons and attach the beads I had to use "invisible thread" and I must confess that on a big project, I just hated it. The number of times that I got in trouble were just too many to count. My patience ran pretty thin at times with that thread, but of course the thread had to be invisible for obvious reasons, so I took some deep breaths and kept going. I am happy that I did as I absolutely love the end result.


(This photo shows the first step)


(In this second step, the photo is now showing the eyelets)


UPDATE ON JUNE 30/2010:

Winter Frost framed. I can't believe the amount of time and number of photos taken in order to produce the photo below. This must have been the weirdest way of photographing a framed piece. I ended up putting it at a certain angle on my desk in a basket no more. Anyway, this is NOT my best accomplishment so far, but it must be my GREATEST effort at trying to produce a decent photo for you all. Hope that you will give me some browny points for "efforts" at least, if not for quality (grinning).


(Framed Winter Frost)

Saturday, June 12, 2010

Tear of Joy: Loretta Spears, designer


Project: Tear of Joy

Loretta Spears' Needle Adventures
 Christmas Heirlooms Collection
 October 1993

Name of designer: Loretta Spears

Type of needlework: Needlepoint

Photos: 4

Comments: I love stitching designs from Loretta Spears. This one is an unpretentious little Christmas designs that Loretta included in her Neelde Adventures, Christmas Heirlooms Collection and I am glad that she did.

There are only two threads used in 'Tear of Joy", Waterlilies and Sarah Bennett Specialties Opalescent threads together with some beads.

As for the finishing of Tear of Joy, it always depends a bit on what I have at home at the time. I try as much as I can to use what I already have. I had some Dupioni fabric which was a similar color and found some lovely already made cording that was just perfect for it. Perhaps, a little too perfect as it blended totally with the ornament, contrary to how Loretta Spears finished hers using a much darker color. I have also put some gold lame just under the canvas as the canvas is only partially stitched. This way there are gold sparkles coming from here and there when looking at the ornament.

I also managed to find in my stash some lovely velvet ribbons of a color that went very well with the colors already used in the stitching and finishing of the ornament so I added that for the final touches. Since the design pattern is exactly the same all over the ornament, I don't think that it really matters that much if part of it is hidden by the velvet ribbon.

You can see previous Loretta Spears projects that I have stitched so far here.


(Close-up photo)


This photo shows how Loretta finished hers
and the top and bottom part of mine before putting them together.


This photo shows the two parts together before
 the cording had been added together with the finishing touches.

Friday, June 11, 2010

Cross Stitch Christmas Ornament: 2004 Ornament Exchange


Project: Christmas Ornament

Designer: Ornament stitched by Pauline
and given to me in a 2004 Christmas ornament exchange

Type of needlework: Cross Stitch

Photo: 1

Comments: This is a Christmas ornament that I have received from Pauline on an exchange made on a Brazilian Yahoo group.

I was a bit surprised when I got it (well, a lot surprised actually) as I expected that all the ornaments stitched and exchanged by the participants in this exchange to be done in Brazilian embroidery, so my very first reaction was of disappointment, but I got over it. 

I think that Pauline has done a great job in stitching and finishing her ornament. She has cut a little piece of tree branch and inserted it at the top between the two layers of Aida as to create a kind of bell pull hardware. Very good thinking there as it makes the finishing quite unique and special. 

She finished it all by tying a piece of ribbon so that the ornament can be hung and by adding fuzzy knitting thread or something of that nature at both ends of the little wood piece, not sure for what medium this thread is originally made for, but anyway it goes very well with her finishing.

Thursday, June 10, 2010

Crazy Quilting Round Robins


Projects: Crazy Quilting Round Robin Blocks

Type of needlework: Mixed media

Designer: Work I have done on some CQ Round Robin blocks

Photos: 5

Interesting online Crazy Quilting Magazine: http://www.cqmagonline.com/

Comments: At one point in my life I did a bit of Crazy Quilting. I have never done much of it as I love to create projects by themselves and not just blocks. I do love its possibilities though. Perhaps one of these days, I will actually create useful projects as there are not many on the market. I know there used to be some online CQ shops that had interesting things but they seem to have vanished. 

With a Round Robin, every crazy quilter creates her own naked block and then send it around to a little group of participants, which in turn do a little bit of work on her block and then mail it to the next person on the list and so on.

Once every participant has done her bit, then the block is returned to the original owner of the block. If the owner of that block had not done any prior work on her naked block, then she probably will have to finish embellishing her own block. If she has done prior work, then her block may return to her all completed. It really all depends on the participants involved and how much work and time they are willing to put on each block that comes their way.

These are a few of the photos of work done on other crazy quilters' blocks. I believe there are only two blocks involved here.

The first photo above, you will see a little hummingbird. It was originally all white, so I dyed it using Ozecraft Dyes and then attached to the CQ block with his beak in the direction of the flowers.


On this photo, I have stiched a lady's hat, adding ribbons and creating some silk ribbon roses on it. Have also done a seam treatment usiing different buttons, making sure the buttons went well together color wise and about the same size. I also made another seam treatment adding a bit of lace which I first dyed a pink shade to go with the colors of this block.


On this photo, I have stitched a little fan and embroidering with silk ribbons. Have added a ribbon at the bottom which I also dyed and added a little dyed flower on top of it. We can see the end of some lace at the bottom left, something I have also dyed and added to a seam. Have also done the seam treatment at the top of photo.


On this photo, we can also see some of the work that the other crazy quilters have done on this block.


On this other block, I have done a couple of seam treatments and spent a good amount of stitching time embroidering the willow tree on this block. The remaining work has been done by other crazy quilters.

Another crazy quilters also thought of doing something similar to my little hummingbird with different dye colors and a different flower, so with the same theme, options are only limited by our imagination or lack of it (grinning).

Wednesday, June 9, 2010

Antique Ivory Pincushion: Karen Kraus, designer


Project: Antique Ivory pincushion
Designer: Karen Kraus
(Moonspun Designs)

Type of needlework: Mixed media

Photo: 1


Comments: I have actually made 3 of those lovely pincushion designs. Have kept one for myself and given two away to friends. This one was given to Rengin and went all the way to Turkey where it found a good home.

These designs are just so elegant, fun to put together in a rather short amount of time too. Karen has kits and also patterns only for those of us who wants to use our own supplies.

You can see Victorian Heart Pincushion here and Triangle Pincushion here. Looking at Karen's other designs makes it very tempting for me to make a few additional ones.

Tuesday, June 8, 2010

Mystery in a Corner: Gay Ann Rogers, designer


Project: Mystery in a Corner

Designer: Gay Ann Rogers

Type of needlework: Needlepoint

Photos: 34


Shining Needle Society: http://www.shiningneedlesociety.com/

Comments: One of the goal for Gay Ann Rogers in her Shining Needle Society classroom when she suggested  Mystery in a Corner for our collective project was to help us learn a bit more about colors.

At first, I resisted that new project mainly because I already had so many different projects in progress and lots more waiting in the wings, but after giving it quite a bit of thought, I decided to go ahead and participate because as I said before it had been designed to help us with color decisions, something that I can always learn more about.

The first decision I had to make was to choose the colors. I selected Woodlands as my Watercolour and then Pam from Tomorrow's Heirlooms picked up the additional threads to make my special combination. I thus ended up with the following colors: greens, blues, topaz with my already selected Woodlands Watercolours.

There is a lot of photos in this blog entry as one of my goal while doing this project was to end up with a visual documentation of what actually happens when I put a certain color next to another one. I have found fascinating to see the impact that each successive colors had on the previous ones.

Once I got all my colors in front of me, then I realized that although I liked all the colors, I prefered the blue, so during all the days that I stitched on this project I was there rooting for BLUE. I wanted BLUE to win over the other colors. Some days it seemed that things were going my way and on other days, they were not, so I kept stitching until they were going my way (grinning).

(My thread selection: My Watercolor selection done from some Waterlilies threads I had at home. Interestingly
enough there seemed to have had more blue in it than the actual Watercolor. I do love that green but that blue
 really appeals to me )

(From here on there will be a succession of photographs showing all different steps.
On this one I just love to see all that BLUE)

(BLUE followed by Topaz)

(Some Watercolor added with some orange tints)

(BLUE is winning here)

(BLUE still doing good)

(BLUE looks great but there is lots of green too)

(Lots of green. Where is my BLUE?)

(WOW, Lovely BLUE)

(Even more BLUE here)

(Let's bring all that BLUE)

(Green added but can still see lots of BLUE)

(Still happy with my BLUE)

(Looks like a mixture of BLUE and green here)

(OUPS, getting greener and greener here)

(Even  more green - where it my BLUE?)

(Things are not getting any better)

(Oups, a tiny bit of additional BLUE)

(Topaz added after my little bit of BLUE)

(Love the BLUE)

(A tiny bit more BLUE)

(Adding a bit of Watercolor with a bit of orange in it)
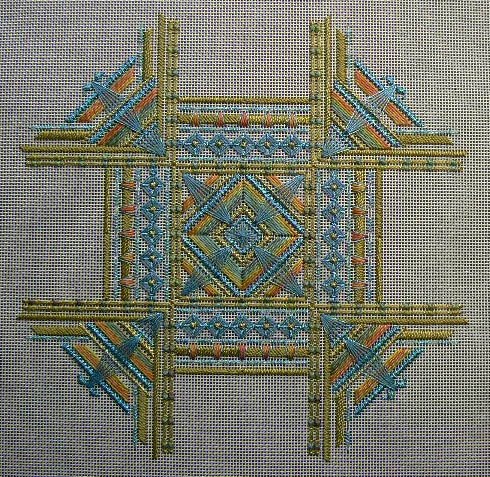
(Adding a bit more BLUE)

(NOW we are talking, more BLUE that we can really see)

(A bit more BLUE)

(YOUPPEE, more BLUE)

(Things are really going well, MORE BLUE)

(Oups, a bit of green)

(We can barely see the additional BLUE here)

(Green added)

(Lots of green but I can still see some nice BLUE too)

(Well that is ONE way of adding BLUE with a BLUE MAT)

We now have a BLUE Mat but with a green frame
Oh well, that is what we call making a "Compromise"

Monday, June 7, 2010

Dancing Queen: Jean Walter, designer


Project: Dancing Queen

Designer: Jean Walter

Type of needlework: Cross Stitch

Photos: 2


Comments: New Year Eve was coming fast and I happened to come across this funny cross stitch chart and I immediately thought of a good friend of mine.

I could actually visualize her dancing the night away and I could not stop grinning from ear to ear while thinking about it.  I knew then that I just had to stitch it for her. This darling design shows a woman with attitude, full of confidence, knowing her worth and .......... unless she  ........... just had one too many. Nah!

I decided to finish it as a little Artistic Trading Card (ATC) so that she could carry it with her and show it to her friends and family members, which she did and it brought lots of laughs.


(Photo before finishing)

Sunday, June 6, 2010

Easter Egg called "In the Blue": 2007 Egg Exchange: Anne Stradal, designer


Project: In the Blue

Designer: Anne Stradal

Type of needlework: Needlepoint

Photo: 1


Anne's Original Easter egg stitched in pink here.


Comments: This lovely egg comes for an Easter egg exchange that was done in 2007 in the Needlepoint_Etc Yahoo group. Only a few people participated in that exchange and things went very smoothly and lots of lovely Easter eggs were exchanged between the participants.

In this exchange I inherited Anne Stradal's lovely Easter egg called "In the Pink", appropriate name I thought of giving it since the original one that she had stitched was blue and called "In the Blue".

I now have 3 Easter eggs and slowly, very slowly I am building myself a little collection. WRONG, I have only 2, since I have given away the one called "In the Garden" in that same exchange. BOO HOO, my collection is growing even slower than I thought. Well, I suppose that it means that I have to get cracking and stitch some more.