Embroideries

Embroideries

Tuesday, April 6, 2010

Dracula Spider


Project: Dracula Spider

Type of needlework: Embroidery

Designer: A drawing that I use from http://cathycreatif.free.fr/index_galerie.php

Photo: 1

Tutorial about how to finish a postcard on "No Matter Where I go, I always meet myself there"

Comments: We were making a postcard exchange on the International Crazy Quilting group in what seems to be a lifetime ago and if I recall correctly, we could stitch whatever we wanted, so I decided to go with an Halloween theme. I started searching for some designs and found this silly little scene, which after stitching I finished as a postcard for the exchange.

Monday, April 5, 2010

Peace Tree: Jim Wurth, designer


Project: Peace Tree
(11th of the series)

Designer: Jim Wurth

Series: Dodecagon ornaments

Type of needlework: Needlepoint

Photo: 1

Jim's Yahoo group: http://groups.yahoo.com/group/DodecagonSeriesOrnaments/

Comments: We are getting close to the end of this dodecagon series. Only one more remains to be added to my blog. Yesterday was Easter and today it is starting to look like Christmas but only for one day. Perhaps tomorrow we can have Halloween (smiling).

Sunday, April 4, 2010

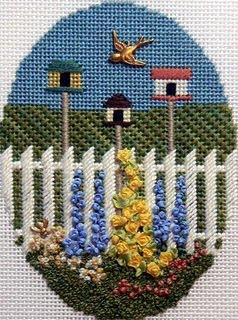
In the Garden, Anne Stradal, designer


Project: In the garden

Designer: Anne Stradal

Type of needlework: Needlepoint and Silk Ribbon embroidery
(Painted canvas)

Photos: 2


Comments: I have actually stitched this project for an Easter egg exchange a few years back. I just love the colors chosen. To me they make me think of Spring. I have changed a few things in Anne's design. If you go to Anne's website and look at her eggs, you will see that hers is different than mine. I have changed the way I did the grass and also the flowers and have removed the little rabbit and added a bird instead.

I have done the cording using the two main colors, blue and green and it was then ready to go to its new home. That is one stitched project that I was really sorry to see it go. Oh well, I can always look at the photographs.

Saturday, April 3, 2010

Beginner's Hardanger: Marion Scoular, designer


Project: Beginner's Hardanger
(1999)

Designer: Marion Scoular

Type of needlework: Hardanger

Photos: 3

An EGA correspondence course: http://www.egausa.org/

Taken with EGA CyberStitchers: http://www.cyberstitchers.org/

Comments: Before I took this group correspondence course with EGA CyberStitchers, a course written by Marion exclusively for The Embroiderers' Guild of America, I had only done a few tiny hardanger projects and I wanted to learn the proper way to do hardanger.

I am so happy that I took this course as I had been having a few problems understanding on my own some stitches and that even with the help of some hardanger books I had, but with the instructions in this course, everything became clear to me and had no problem doing what was required in this piece. Marion's instructions are just wonderful. As a beginner's hardanger course, I could not have asked for better.

The design size is approximately 8 3/4 inch square. I finished mine using a 14" by 14" pillow form.


For the fun of it, I took a photo showing what the design looks like depending which way I would finish it. I decided to go with the same orientation that Marion used as it just seemed to make more sense.

Friday, April 2, 2010

Assisi style rabbits: Tanja Berlin, designer


Project: Assisi style rabbits

Designer: Tanja Berlin

Type of needlework: Assisi embroidery

Photos: 2

Tanja's website where you can find this free design here.

Tanja Berlin web site: http://www.berlinembroidery.com/

Tanja's personal gallery here

Tanja's customer's embroidery gallery here

Comments: One of my goal is to try as many different types of embroidery as possible, so when I saw this little Assisi project on Tanja's website, I decided to give it a go as I thought it would be ideal to finish it as a little pincushion and that is the reason why I kept the finishing very simple. I feel like I can't never have too many pincushions, nor needlebooks.

Thursday, April 1, 2010

Triangle Pincushion: Karen Krauss, designer


Project: Triangle Pincushion

Designer: Karen Kraus
(Moonspun Designs)

Type of needlework: Mixed media

Photo: 1

Moonspun's website: http://www.moonspundesigns.com/
 
Comments: At the time I purchased three different pincushion kits from Moonspun Designs, kept one for myself and given the other two to friends.
 
They are almost too cute to stick needles into them, so my friends keep them as souvenirs. It is nice to be surrounded by lovely things in our stitching room.
 
This project was quick to do and quite easy to put together.

Wednesday, March 31, 2010

Persian Fantasy: Jane D. Zimmerman, designer


Project: Persian Fantasy
(Skill level: Advance intermediate)

Designer: Jane D. Zimmerman

Type of needlework: Historical techniques of Eastern and Western silk
and metal thread embroidery through the ages,
in addition to Florentine work and some traditional canvas stitches

Photos: 29


Student's gallery here.

This was a Shining Needle Society cyberclass.

Shining Needle Society: http://www.shiningneedlesociety.com/


Comments: I was surprised at the number of photos taken when I was blogging this piece on my old blog "Love to Stitch", but decided to add them all on this new blog since some of you may have this project in your UFO pile and may like to see some close-up photos of the different steps.

Jane offered kit option with color choices. Mine is "Green and Cranberry" If you check on the student's gallery, you will some of the other color choices offered.

The five four photographs including the one above have been taken after completion of this project. All the photos afterwards have been taken when I was actually blogging the piece on my previous blog, something that I do not do anymore.

(A side view of the finished project)

(Close-up of the central area)

(A view of one side of the finished piece)

(A view of the bottom with parts of middle section and right side)


Now, all the photographs above have been taken from my previous blog and I believe that they are in chronological order.
(Photo showing area 1)

(Area 3)

(Area 2

(Areas 1, 2 and 3)

(Part of area 5 with area 3)

(Areas 1, 3 and 5)

(Areas 1, 3 and 5)

(All areas 1, 3 and 5 completed)

(Different view of the above)

(Area 4)

(Area 4 completed in all four corners)

(View of beginning of area 6)

(Area 6)

(Photo showing some area 6 completed and some not yet stitched)

(A little more done on area 6)

(Areas 1, 2, 3, 4, 5 and 6 completed)


(Areas 7 and 8)

(Areas 7 and 8 completed in all four corners)

(Areas 7, 8 and 9 completed in one corner)

(General view of what has been stitched so far)

I stopped blogging for a while and when I restarted, since I am not blogging any projects anymore but blogging only completed ones, I have taken the 5 final photographs after completion of this project and they are at the beginning of this blog entry.

For those of you who have looked up to here, a bit more information about this project. Jane says "This 11.5" by 11.5" geometric design of octagons and squares, inspired by a Chinese fabric, is executed on  #18 canvas in two color families of silk (or cotton) and metallics. The techniques include laidwork/treillis fillings, burden stitch, pattern couching, padding, canvas composite variations, and couching"

I will add a final photo here after the project comes back from the framer. I will let you know about the update then.

I am very happy that I took this cyberclass with Jane. It was a long stitch, but the end result makes it very worthwhile.

UPDATE: April 24, 2010

 I have received Persian Fantasy back from our framer and have taken lots of photos and I am not happy with any of them.

One of them shows the frame itself wonderfully but there are glares on the mat. Another photo shows the frame project well but the frame looks flat. I have tried dozens of times to get a photo like the one that shows the frame beautifully but have not been able to reproduce it one single time. How frustrating is that?

I took a close up of the frame itself for good measure, but I think the one with the glares on the mat that shows the frame perfectly is the one that will give you the best idea of how nice that frame makes Persian Fantasy look like.


(This is the photo that really shows best the frame and gives you an idea of how it looks in person but the flares are not a pretty sight)

(This photo is better because there is no glare on it, but the frame somehow looks flat)

(This is a close-up of the frame)

Tuesday, March 30, 2010

European Scene: The Shambles York


Project: The Shambles York
(Landmark Designs)

Designer: M. & G. Luckman
(Produced in Keswick, Cumbria)

Type of needlework: Needlepoint
(simple long stitch tapestry)

Photos: 2

Comments: Over the years we have travelled all over Europe, and in this particular instance we were somewhere in England  when I spotted a little shop where they had needlework in their window display, so we went inside and I saw this design and it looked so charming added to the fact that I love European architecture, I decided that I had to purchase it.The Shambles York came as a kit with canvas and wools. The finished size is 6" by 9 1/4".

We had it finished with a very simple frame and I really like the way it looks.

Monday, March 29, 2010

Artistic dolls

(Green doll on the left was the second one I made and the pink angel one on the right was made by Terry)


Project: Christmas exchange with fabric dolls

Designers: Dolls' outfits, hairdos and selection of faces applied on the dolls shown in all the photos have been either made by Terry, Kerry or myself

Type of needlework: Artistic dolls

Photos: 6

Joggles web store : http://www.joggles.com/ 
where all the items have been purchased at the time we made the exchange

Comments: I was part of a little group of stitchers, in what seems like a lifetime ago, when one day we decided that it would be fun to make a little exchange between us for that upcoming Christmas. We had no idea what we could make, so we started suggesting things without much enthusiasm for any of the suggestions that far then one of the woman in our little group suggested that we could make artistic dolls. Jackie told us that she had made some in the past and they were easy to make, fun and not expensive, which was something that was in everyone's mind at the time.

Jackie sent us to a webstore where she had purchased hers and we each purchased some. I purchased 3 myself. As you can see from one of the photo below, they are very basic fabric dolls (the dolls were made of different fabric and colors, our choice to make), we got some different artificial hair colors, various printed faces to be transfered on the doll's head, a bit of fabric that we all had plenty of in our stash since we were all crazy quilters, some threads and a little bit of artistic imagination and we were ready to go.

I was so out of my element with this project that it was not even funny at the time and that project did not seem as easy as Jackie was making it to be, but I was willing to try and hope for the best. I made two dolls and received two lovely ones in return.

On the photo above, you can see my second doll, the one in green with reddish hair.

The photo just here below shows you what those dolls looked like when I received them from Joggles together with choices of doll faces and curly hairs of different colors.

Fabric doll, doll face transfers and curly hair
(I had purchased 3 fabric dolls of different colors, made 2 and this one remains for a later day)


The green and purple doll above is the first one I made. As you can see, I made her an everyday wear, nothing complicated but I need to give myself credit because the colors of her outfit perfectly matched the fabric of the doll itself. Jackie got this doll of mine in the exchange.


These are the two dolls that I have received in the exchange. The one on the left was made by Terry and the one on the right by Kerry. One of the girl was ready to fly like an angel and the other one to party all night long.


The doll that Kerry made standing alone.

(Photo of the doll Terry made for me - after she took this photo
she decided to add a little necklace as can be seen on photos above)

Sunday, March 28, 2010

Candle Christmas ornament


Project: Candle Christmas ornament

Designer: Elsie Ottinger

Type of needlework: Brazilian embroidery

Photo: 1

Website showing Edmar threads used for this project

Comments: I used to belong to a Yahoo group where Elsie was helping stitchers to learn how to do Brazilian embroidery and she created a few designs that she generously shared with us all as members of her group.

This is actually my very first try at Brazilian embroidery. I have stitched others since then which I will be posting later.

I have also two Brazilian embroidery UFOs which I intent to finish in the coming months and I will be adding them to my blog upon their completion.