Embroideries

Embroideries

Wednesday, June 2, 2010

Faithful Companions: Susan O'Connor, designer


Project: Faithful Companions
(Scissor fobs)

Designer: Susan O'Connor of Victoria, Australia

Type of needlework: Needlepoint

Photos: 2

Inspirations magazine Issue #25 project, pages 28 - 33

Some of Susan other designs here.

Comments: I have made those two lovely scissor fobs designed by Susan O'Connor for a friend some years ago. She was in need of some scissor fobs and I had just seen some in my Inspirations magazine, so I thought of surprising her with a couple. They were fun to stitch and relatively easy to finish too.

As usual I have not made any for myself. Isn't it always the same thing with us stitchers?

Complete instructions for stitching and finishing including the special tassel included in the magazine with lots and lots of steps by steps photos.

(Photo showing the back of the scissor fobs)

Tuesday, June 1, 2010

A Little Story with Artistic Trading Cards: The Secret Knicker Gang

ATC # 1: Created by Elaine


Project: A Litttle Story with Artistic Trading Cards

Designers: The Secret Knicker Gang

Type of needlwork: Artistic Trading Cards

Photos: 7

Comments: The idea of creating a little story with ATCs (Artistic Trading Cards) came to the Secret Knicker Gang, minus myself, during the time we were making the miniature knickers.

As I said in a previous post here, we had lots of fun, exchanging ideas, joking around, etc. and since I am Francophone, I sometimes express myself in ways that is not what one can call "perfect" English and it makes things funny at times.

Anyway, we kept talking about dropping our knickers at the post office to send to Terry and it did not take too long before ideas germinated in their mind and they started plotting something else.

Without my knowing anything about it, the Secret Knicker Gang decided to play a secondary joke on me this time around and made those little ATCs telling a little story. Each member of the Secret Knicker Gang was responsible for her part in that story.

In the 1st Artistic Trading Card above, Elaine established my position as Commander-in-Chief of the Secret Knicker Gang. Would that mean that I was the "bossy" one?

In the 2nd one below, Jackie created a POSTER with my photo and the knickers that got me on the Ten Most Wanted, mostly at post offices.

In the 3rd ATC created by Linda, the Gang tried to establish a good defense for me or perhaps I was just in plain denial about the whole thing. Sometimes they go hand in hand.

In the 4th one created by Jill, she put me in a different pair of knickers, one that would fit better with the prison life that might or would be in store for me, if things went all wrong.

In the 5th ATC created by Catharine, we can see my initials, a saw, a heart and a pair of knickers. Does that  mean a broken heart due to dropping my knickers at the Post Office or over a bad possible outcome like "life in prison"?

In the 6th one, Denise provided me with some useful tools that I might/would need in prison, perhaps to launch a daring escape.

In the 7th  and final ATC created by Kerry, she is showing everyone a precedent which perhaps might be used in court by my attorney for my defense. I am thinking that if that does not prove my innocence, I am not sure what will. I may be able to stay home after all (big grin)

---------------------------------

SPECIAL NOTE ABOUT A POSSIBLE MOUNTMELLICK STITCH ALONG

 Yvette Stanton is considering having a Stitch Along with one of her Mountmellick project if enough stitchers are interested in participating. You may read more about it here and perhaps you could leave her a message letting her know if that is something that you might be interested in participating in.

Yvette Stanton website is Vetty Creations.  I intend to participate myself. I have got most of her books, but have not yet stitched anything of hers, so I thought that this would be an ideal way to start me going with this technique.


--------------------------------

Now, let's continue with the little story created by The Secret Knicker Gang

ATC #2: Created by Jackie Y.


ATC #3: Created by Linda F.


ATC #4: Created by Jill


ATC #5: Created by Catharine


ATC #6: Created by Denise


ATC #7: Created by Kerry


-- END OF STORY and no harm ever came to me as of course there was never any actual dropping of knickers except of course those that had already been packed in a nice little package for Terry --

Monday, May 31, 2010

Miniature knickers for a friend in need: The Secret Knicker Gang, designers

(Created by Catharine)


Project: Miniature knickers for a friend in need

Designers: The Secret Knicker Gang

Type of needlework: Mixed media and Sewing

Photos: 8

Comments: I bet that some of you are wondering what miniature knickers are doing on my blog.

I sometimes  mention that I used to co-own a crazy quilt group with a friend. Well, it all started back then as a big joke concerning my good friend Terry.

I am a big teaser and there is something that happened during that time that just got my imagination going. She often said to me and also to the group after someone wrote something especially funny that she almost peed in her knickers while reading it.

Oh yes, they use the word "knickers" in dear old England, so everything started from those innocent enough words, at least in her own mind. BUT, I am French speaking (Canadian) and down here knickers is not quite the word we would use for such item. When I first encountered the word, of course nobody had to draw me any picture, I  knew what she was talking about, but somehow the visuals I got each time, in my probably much too fertile imagination, were of those old fashioned undergarments. I am talking years ago here and of course each time that I visualize any of them, I laughed myself something silly.

I started chatting about this to some other friends in that group and can't remember exactly the sequence of events, but some of us thought it would be such a funny thing to just make her some miniature knickers and just put them in the mail one by one as we each completed ours. I could almost envision the expression on her face (strong imagination helping here) when she would be opening the first little package, then the second, then the third ..................... well, you see the picture I am sure.

A few friends thought this would be fun too and wanted to join me in this little adventure and they in turn talked to a few of their friends and we ended up a nice little group of friends all wanting to participate in this little joke. 

In order to keep our emails back and forth secrets, we decided it would be better to have a special place where we could exchange ideas and jokes and we created a special group just for that purpose and we called ourselves "The Secret Knicker Gang". I must say that we had the best of time making them (I know that I sure did) and joking amongst ourselves about them as we were working on them. Oh yes, almost forgot, the idea of the joke was that Terry would have lots of spare knickers to change when .......... well I am sure that you are getting the idea and I don't have to spell it out, right?

You will see the photos of the knickers made by our little group with the names of the person who made each one of them.


(Created by Denise)


(Created by Elaine)


(Created by Jackie)


(Created by Jill)

Well she made one for me after I had seen the miniature one here and loved it so much.


(Created by Kerry)


(Created by Linda)


(Created by Pierrette)

Sunday, May 30, 2010

All dressed up: Bookmark


Project: All dressed up
(Bookmark)

Designer: A composite of drawings that I put together
 to create a bookmark for the son of a friend who was studying Arts

Type of needlework: Embroidery and painting

Photo: 1

Comments: I was looking for something special to make as a gift for the adult son of a dear friend of mine who had returned to university in order to study Arts. He was doing lots of paintings and I suddenly thought that it might be fun to create a special bookmark for him. I started searching around and found some drawings at different places on the web and made a composite drawing, sized it to fit the dimension of a regular bookmark and then transferred my design on fabric with a pencil.

I did a lot of painting on the design, adding a bit here and a bit there, trying to create the impression of an oil painting with watercolours of course. When I was relatively happy with it, I then stitched the outline. The focus on this project was primarily painting on fabric. Of course being a stitcher I had to do a bit of stitching on it and by stitching an outline it defined better the contours.

This is a project that I have really enjoyed working on. It was pure experimentation from start to finish and I had absolutely no idea how the whole project would end up.

Saturday, May 29, 2010

Tara: Devaki Parasuramar, designer


Project: Tara

Designer: Devaki Parasuramar of South Australia

Type of needlework: Ribbon work, silk ribbon and embroidery

Photos: 2

Inspirations magazine: Project comming from Issue #23, pages 52 - 55

Embroidery Canada: Framing article from Susan Donn called "It's time to display"
(Issue Spring 2007)
Comments: This is another of those projects that when I saw it, I wanted to make it. Devaki, the designer, said that one evening she was watching the movie "Gone with the Wind" and got her inspiration to create Tara. Perhaps that is exactly the reason why I felt like I just had to make her for myself as I just love that movie.

The instructions are very well written and it was not difficult to make except that some pieces were rather small and a bit difficult to manipulate but I managed in the end.

For the framing, I had read an article from Susan Donn in Canada in the EAC's Guild magazine about doing finishing with fabric. It is a wonderful idea as it looks good and saves a bit of money from having to bring the finished piece to the framer. Anyway, I think that the more ideas we can get about how to finish our pieces, the better.

That is one of the reason that I belong to lots of Guilds as you just never know where you will find great ideas about projects, finishing, meeting new designers, correspondence classes, etc.


Friday, May 28, 2010

Wild Rose: Patricia Hartman, designer


Project: Wild Rose

Designer: Patricia Hartman

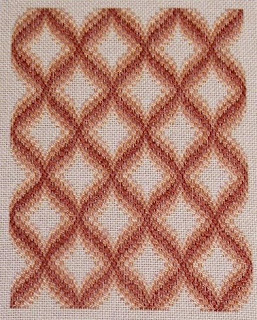
Type of needlework: Bargello

Photos: 2

Other designs from Patricia Hartman here.


Comments: This is a free project that came from the Chapter Project Booklet that as a member of CyberPointers I was able to obtain and stitch with fellow bargello enthusiasts.

I have used the same colors that Patricia Hartman has used for hers, but since none of us have actually seen a color photograph of the initial project, my placing of colors is in all probability different than what did Patricia with hers.

Those are not quite the colors that I normally work with but decided to use them anyway since the name of this project suggested it was a "wild" rose. I must say that I am glad that I followed my instincts and went with her colors instead of changing them as I really love how it looks.


(Close-up of a section with the Jessica's mistake)

I realized that I had made a mistake with the Jessica after taking this photo
and have corrected that mistake afterwards.


UPDATE: JUNE 30/2010

Well, strange things seem to be following me these days. A bit of story here. First of all, I would highly recommend for anyone stitching this piece to stitch it on a bigger piece of canvas than recommended. It will make things much easier for framing.

There was a bit of a mix up between my framer and what my husband had asked her to do with this piece. I requested it to be framed diamond shape. In the past when I made special requests I took the precaution of cutting the canvas according to the orientation I wanted. I did not do it this time around as I felt there was not a whole lot of canvas surrounding the stitched piece, so I just left it as it was after stitching.

They decided to put a black mat under the black canvas and it does look absolutely wonderful. The two frames selected I also love. There is a tiny one inside the bigger pink one.

The only problem is that I ended up with it framed like you can see below, which is not bad at all since this is not a big piece. My framer said that she would redo it if that is what I wanted but I would end up with a smaller frame, which is something that I really don't want, so I have decided to keep it like it is.

Things would have just been so much simpler if my canvas had been bigger to start with. I am one of those stitchers which prefer to have a bigger piece of canvas than a smaller one. Unfortunately for me I had no idea of the dimensions needed when I started working on this project. Anyway, I do like it just the same. It is just one of those things but have learned a few lessons out of it. 


(Framed Wild Rose)

Wednesday, May 26, 2010

Rose Vine Christmas ornament: Wendie Young, designer


Project: Rose Vine Christmas ornament
(adaptation of Windie's pinwheel project)

Designer: Wendie Young

Type of needlework: Embroidery

Photos: 2

Wendie's project can be seen on this website here.

Project found in Embroidery and Cross Stitch magazine, Volume 10, No. 2, pages 16 - 21

Comments: When I came upon this design it was at a time when I was thinking about making Christmas projects. I thought that it was such a cute design and all I had to do was to adapt it a little to make it look Christmassy, so I changed the word "Pins" to "Noel" and made the bullions for the roses red instead of pink.


(Photo showing the finished ornament)

Tuesday, May 25, 2010

Stitching Accessories Trio in Brazilian embroidery


Project: Stitching Accessories Trio

Designer: Created by my friend Terry as a gift for me

Type of needlework: Brazilian embroidery

Photo: 4

Comments: My friend Terry created this little trio (needlecase, pincushion and scissor fob) as a gift for me for a special occasion like a past birthday or Christmas. I can't recall exactly as we have been exchanging gifts for years.

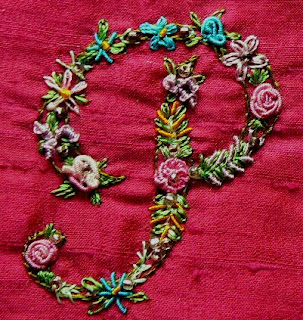
To make the trio, she used some silk dupioni fabric with some Edmar threads. She then outlined the letter "P" on the needlecase, a circle on the pincushion and stitched everything in Brazilian embroidery. The little scissor fob has a different flower on both sides.


(Pincushion close-up)


(Letter "P" closeup from the needlebook)


(Close-up of a corner flower on the needlebook)

Monday, May 24, 2010

Mauve Flame Credit Card Case: DebBee's Designs


Designer: Debbie Rowley

Type of needlework: Bargello

Photos: 8


Comments: I remember looking for both a checkbook cover and a credit card case at the time and asked around for anyone who could direct me to some lovely designs and that is how I found out about DebBee's Designs. I purchased both the bargello checkbook cover and the credit card case. You can either purchase the kit or the pattern and choose your own colors.

So far, I have only completed the credit card case, but I will be stitching the checkbook cover a bit later as they will make a nice set to carry around in my purse. I have actually put my driver's permit in mine with a few other cards.

Above additional photos showing different steps of the stitching.


(This photo shows the finished credit card holder in its clear plastic case before folding in two)


(Photo showing beginning of the bargello design)

(3 different colors have been added to the bargello pattern)


(Close-up of those 3 colors)


(Here a close-up of the credit card case has all been stitched but not yet finished)


(All stitched)


(Photo showing the finishing completed)

Sunday, May 23, 2010

Patches of Snow: Kaitlyn Marie Designs


Project: Patches of Snow
(Mini Stocking)
(1994)

Designer: Kaitlyn Marie Designs

Type of needlework: Beading and needlepoint

Photos: 7

Comments: I think that mini stockings are such a nice addition in any Christmas tree and the more the merrier.

This is actually my second mini stocking that I have done from Kaitlyn Marie Designs, the first one being called Fancy That: Emerald Gold Mini Stocking and you can see it here on a past blog entry.

Contrary to the Emerald & gold mini stocking which was about half needlepointing and half beading, this one was mainly beading with a tiny fraction needlepointing.

Some sections went pretty quickly and others took a bit more times depending on the size of the beads. There was also 3 Pearl Cabochons included in the kit.

Instructions for finishing the little stocking were included and were easy to follow.


(Photo showing the divided patches)


(On this photo, patches 1, 2, 3 and 4 completed)


(Photo showing patches 5, 6, 7 and 8 completed)


(Photo showing patches 9 and 10 completed)


(Patches 11, 12 and 13 completed)


(Photo showing the cover page for this project)