Embroideries

Embroideries

Monday, June 21, 2010

Angelina Fibers: Golden Heart Ornament


Project: Angelina Fibers Golden Heart ornament

Designer: My friend Terry

Type of needlework: Mixed media

Photo: 1

Angelina Fibers Tutorial here on the Joggles website 

Angelina—Reflected & Refracted Light by Sonja Lee-Austin
 
Interesting project ideas on this blog: http://fembellish.wordpress.com/category/fibers/angelina/
 

Comments: Terry surprised me one year with a little Christmas ornament that she made for me with Angelina fibers. I have never used it myself so far, but I am highly interested in finding out exactly what can be done with this.

I do happen to have a needlepoint project that I will soon start working on that uses Angelina Fibers, so it won't be very long before I actually get some experience with those fibers.

I have included above a few links to get us all started reading about it if we so desire. There are also books on the market about that topic.

Sunday, June 20, 2010

Rose Arbour Sampler: Thea Dueck, designer


Designer: Thea Dueck for The Victoria Sampler

Type of needlework: Mixed Media

Photos: 2

Beautiful free projects on The Victoria Sampler website here.

Comments: This pattern from The Victoria Sampler was stitched as a gift for a friend. I mailed it to her unframed and I must say that her framer has done a wonderful job with it. It looks very similar to the one from The Victoria Sampler, which I thought was just perfect for it.


(Photo showing the stitched pattern as mailed to my friend)

Saturday, June 19, 2010

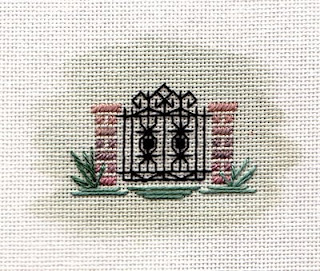
Miniature Garden Gate: Gay Ann Rogers, designer


Project: Miniature Garden Gate

Designer: Gay Ann Rogers

Type of needlework: Needlepoint

Photos: 2


Shining Needle Society: http://www.shiningneedlesociety.com/

Finishing forms used for this project can be found here.

Comments: After having stitched the lovely miniature Georgian House, I went ahead and stitched the miniature Garden Gate.

The finishing is so easy to do with those metal finishing forms. I don't use them all the time. It really depends on the end result I am striking for. In this case I thought it would work very nicely.

This photo below shows the two little ornaments side by side.


Friday, June 18, 2010

Miniature Georgian house: Gay Ann Rogers, designer


Project: Miniature Georgian House

Designer: Gay Ann Rogers

Type of needlework: Needlepoint

Photo: 1


Shining Needle Society: http://www.shiningneedlesociety.com/

Comments: I thought it would be fun to stitch this cute little miniature Georgian House and finish it as an ornament and put on my Christmas tree during the holidays.  This was also really a quick stitch. We all need little projects like this one from time to time to do between bigger and more time consuming ones.

In case you are wondering, there was a bit of green paint applied on the canvas by Gay Ann before I did any stitching. This gave me some ideas for future projects as it seems rather easy to do really.

I am full of ideas. I just wish I had more time to work on them all. I do think that each project teaches me something and better prepare me for the one that follows.

In a following post, you will see the accompanying one which is a miniature garden gate which also had a bit of paint applied on the canvas by Gay Ann. The two of them together  make a nice little set.

Thursday, June 17, 2010

Complimentary Cup of Tea, Coffee or Hot Chocolate While Reading "Cross Stitch Horrors"


Project: Complimentary Cup of Tea, Coffee or Hot Chocolate


Type of needlework: Mixed media

Photo: 1

Comments: After tracing the drawing, I painted the saucer and the cup with watercolor paint and stitched the outline.

I thought this little design was just the thing for when I have something fun and/or interesting for you to read. What could be better than to put our feet up in a comfortable chair holding a good cup of coffee, tea or hot chocolate and just relax for a few minutes.

Enjoy the following!

=====

CROSS STITCH HORRORS

Today I joined a cross stitch class
And though it may sound dumb
Where once my fingers used to be
I now possessed a thumb

I couldn't thread the needle
And this creates a "hitch"
For without a threaded needle
You can't create a stitch

The instructor had to thread it
Amd though it sounds kind hearted
She muttered lots of muffled words
And hastily departed

She showed us how to make a stitch
And where we should begin
But the first stitch ended painfully
Beneath my tender skin

Well, I've never been heroic
And I believe one lady said
The screams that issued from my mouth
Would surely wake the dead

The class was in an uproar
As they crammed to take a peek
For my face was now a deathly white
And my legs were feeling weak

My finger was in tatters
I tried hard not to cry
But the gash looked like a canyon
There was a good chance that I'd die

The teacher yelled impatiently
What she said I'll never know
For I fainted in an instant
When the blood began to flow

The teacher phoned the ambulance
For the wound was very deep
But she said the blood-drenched patterns
Could now be mine to keep

As they placed me in the ambulance
She let out such a shriek
When I tried to reassure her
That I'd be back next week!

=======

(I unfortunately do not know who is the author of this,
but I just found it so funny and posted on my blog so that I could read it from time to time
when I needed a good hearty laugh)

Wednesday, June 16, 2010

End-of-Term Examination Ornament: Gay Ann Rogers, designer


Project: End-of-Term Examination ornament

Designer: Gay Ann Rogers

Type of needlework: Needlepoint

Photos: 5


Shining Needle Society: http://www.shiningneedlesociety.com/

Comments: Well, it seems that Gay Ann wanted to give us a little test in order to find out if we had learned anything at all with our Mystery in a Corner so she had this little ornament for us to stitch in any colors that we wanted.

Since I had left over threads from Mystery in a Corner, I thought that I might as well used them, but this little design would look great in Christmassy colors too or any colors that someone wants to use.

I still had the same objective as I have had with Mystery in a Corner, still rooting for BLUE and fighting green at every corner.

I did the finishing of this little ornament using the book called Sandy's Finishing Touches.  I must say that I consider this book my finishing bible. I have other books on finishing but I always seem to go back to this one. I just feel comfortable with it.


(First photo taken showing the first few steps of this ornament)

(Concentrating on adding BLUE here)

(I love that bit of range with it. Makes it look alive)

(Ornament all stitched up and ready for finishing)

Tuesday, June 15, 2010

The Stone Bridge: Rowandean Embroidery, designers


Project: The Stone Bridge


Type of needlework: Embroidery

Photo: 1

Rowandean link where this project came from is here.

Comments: My friend Terry stitched this lovely design for me and surprised me with it years ago.

Looking at the Rowandean Embroidery website, they have some fascinating ideas. I love that part of the embroidery design goes over the mat and also the painted fabric on which embroidery is done.

Those are things that I have been highly interested in for quite some time now and I want to do similar things myself through experimentation. I have also seen other designers do something a bit similar to this.

Monday, June 14, 2010

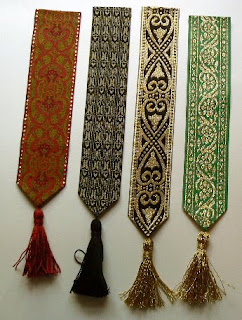
Braid Bookmark: Deborah Schneebeli-Morrell


Project: Braid bookmark

Designer: Deborah Schneebeli-Morrell

Type of needlework: Mixed media

Photo: 2

Comments: When I take the time to look INSIDE all the wonderful books I have in my library, I find all kinds of wonderful ideas.

When opening the book called "The Victorian Book of Ribbons and Roses", an Inspiring Collection of Delightful Projects and Pastimes from a Bygone Age by Deborah Schneebeli-Morrell, I came across a wonderful idea about making fabric bookmarkswithout having to spend lots of time actually doing them.

All someone needs for this project is to find some already made braid that appeals to her or him, have some fabric glue handy and be able to make a tassel with some thread that will go nicely with the colors of the selected braid. 

At home we are all avid book readers, so we can never have too many bookmarks. I have made 4 so far, two for my husband and I will keep two for myself. No doubt I will make others in the near future, as soon as I manage to find some interesting braids.

Here is a photo showing the 4 bookmarks that I made so far.

Sunday, June 13, 2010

Winter Frost: M. Lashley-Liston, designer


Project: Winter Frost
(1996)

Designer: M. Lashley-Liston

Type of needlework: Needlepoint

Photos: 3

This design can be seen here on the ANG website

Comments: When I saw this project, I immediately wanted to stitch it as I just loved the elegance of its design and the stitches used.

If you are wondering what kind of blue shade the canvas for this project is,  it is Leviathan blue. This project also only needed a few different threads and beads.

I started by stitching the first two steps shown on photos below and then the following three steps, I more or less followed the directions given when decorating my tree but not entirely, so there are some differences between mine and the one stitched by the designer, which an observant eye can see by following the ANG link above and looking at the original.

In order to couch the different ribbons and attach the beads I had to use "invisible thread" and I must confess that on a big project, I just hated it. The number of times that I got in trouble were just too many to count. My patience ran pretty thin at times with that thread, but of course the thread had to be invisible for obvious reasons, so I took some deep breaths and kept going. I am happy that I did as I absolutely love the end result.


(This photo shows the first step)


(In this second step, the photo is now showing the eyelets)


UPDATE ON JUNE 30/2010:

Winter Frost framed. I can't believe the amount of time and number of photos taken in order to produce the photo below. This must have been the weirdest way of photographing a framed piece. I ended up putting it at a certain angle on my desk in a basket no more. Anyway, this is NOT my best accomplishment so far, but it must be my GREATEST effort at trying to produce a decent photo for you all. Hope that you will give me some browny points for "efforts" at least, if not for quality (grinning).


(Framed Winter Frost)

Saturday, June 12, 2010

Tear of Joy: Loretta Spears, designer


Project: Tear of Joy

Loretta Spears' Needle Adventures
 Christmas Heirlooms Collection
 October 1993

Name of designer: Loretta Spears

Type of needlework: Needlepoint

Photos: 4

Comments: I love stitching designs from Loretta Spears. This one is an unpretentious little Christmas designs that Loretta included in her Neelde Adventures, Christmas Heirlooms Collection and I am glad that she did.

There are only two threads used in 'Tear of Joy", Waterlilies and Sarah Bennett Specialties Opalescent threads together with some beads.

As for the finishing of Tear of Joy, it always depends a bit on what I have at home at the time. I try as much as I can to use what I already have. I had some Dupioni fabric which was a similar color and found some lovely already made cording that was just perfect for it. Perhaps, a little too perfect as it blended totally with the ornament, contrary to how Loretta Spears finished hers using a much darker color. I have also put some gold lame just under the canvas as the canvas is only partially stitched. This way there are gold sparkles coming from here and there when looking at the ornament.

I also managed to find in my stash some lovely velvet ribbons of a color that went very well with the colors already used in the stitching and finishing of the ornament so I added that for the final touches. Since the design pattern is exactly the same all over the ornament, I don't think that it really matters that much if part of it is hidden by the velvet ribbon.

You can see previous Loretta Spears projects that I have stitched so far here.


(Close-up photo)


This photo shows how Loretta finished hers
and the top and bottom part of mine before putting them together.


This photo shows the two parts together before
 the cording had been added together with the finishing touches.