Embroideries

Embroideries

Saturday, November 27, 2010

Five Flower Sampler: Delma Moore, designer


Project: Five Flower Sampler

Designer: Delma Moore

Type of Needlework: Brazilian Embroidery

Photos: 9 (so far)

Blackberry Lane website: http://www.blackberrylane.com.au/

Other Delma Moore design completed here.

Other Brazilian Embroidery projects completed here.

Comments: WORK IN PROGRESS

This is another project that I have started but not yet completed. The fun part is yet to be done, meaning the flowers. I really need to take some time in 2011 to finish this project.


(Photo showing the necessary threads for this project)


(A few leaves stitched)


(Close-up of the leaves)


(Another leave closeup)


(Leaves and some stems)


(Closeup)


(Another closeup)


(Photo showing what has been done at this point.
Flowers still need to be stitched as well as border)
Monday, November 15, 2010

The Thistle: Carole Lake, designer


Project: The Thistle

Designer: Carole Lake

Type of needlework: Needlepoint

Photos: 4

Carole's blog: http://www.carolelake.com/

Other projects that I have stitched from Carole here.

Comments: This is a little project that I wanted to stitch when I saw it.

The more diverse project I can stitch, the higher goes my learning curve. On this project, I especially like trying the turkey work. I had seen it many times before but never had the opportunity to work on a project that needed that stitch. It was fun to do and not difficult at all with Carole's excellent directions.

I also enjoyed stitching the border around the thistle. That was a new way of making one for me, so will keep that in mind the next time I am in need of one.

I have never done much free-form stitching either on canvas and stitching the leaves gave me a bit of practice. I can't say that I am completely comfortable with it but I guess the more I will do, the better I will get at it. I have no problem doing free-form on fabric but always find it a bit more difficult on canvas. For me, I find canvas limiting to some extent due to the holes, but perhaps I just need to get more experience with it by doing projects that call for special techniques.


(This is a frontal view of the finished ornament)


(Photo that came with Carole's project)


(Stitched Thistle before the finishing)

Friday, November 12, 2010

4-Way Bargello Orchid: Toni Gerdes, designer


UPDATE 04/24/2011:

I wanted to finish this project so that it would be practical, so I have used a 6" by 6" Sudberry House trivet for it.

Under the canvas I have added a piece of fabric of a color similar to the canvas itself because of all the unstitched areas.

Again, I am afraid that the photo is not too good because of the glass reflection.

===================================


(I am planning to go out shopping and see what
I can find that would look great in the middle of this design)

(The green leaves in the center came with the kit)


(This is the photo that came with Toni Gerdes project)


(3rd photo)


Project: 4-Way Bargello Orchid
Designer: Toni Gerdes
Type of needlework: Bargello

Photos: 6

ANG CyberPointers website: http://www.cyberpointers.org/


Comments: WORK IN PROGRESS

This is an absolutely lovely design that as member of ANG CyberPointers we received for free during our bimonthly meeting.
Toni was there in Cyberspace to help us along whenever we had questions
and she is still there even if the meeting is now over to answer our questions. Sometimes I wonder what we, stitchers, used to do before we started going online. We all used to stitch pretty much by ourselves without much communication with the other stitchers. Things sure have changed a lot since then and in this case for the better.

I started this project this past Thursday (November 4th) and I have already half of it completed. I just love these colors. I am using one of Toni's colorways, so can't get any credit for how well this is turning out to be. This is the Lavender/Green colorway.

This project can be done in 3 different sizes, mine will be the smallest size, which is 6" by 6". I thought that was a nice size as I don't always feel like ending up with big projects. Smaller also means that it takes less time to have a completed project.

In this project, there is one overdyed floss and all the rest of the threads are just Anchor floss of two different color families in different shades and 4 little plastic green leaves that will go in the middle where the dark lavender is located.

Now my big question is do I stop stitching after what has been done on the 5th photo which is the first photo above or do I continue stitching in order to do exactly as Toni Gerdes has done on her project (third photo above)?

The answer to that question is "I am not sure". If you have some opinions one way or another, I would love to hear from you. Please send me a little message at my email address here: LovetoStitch99@comcast.net .


(This is the 2nd photo showing the stitched center)


(This is the first photo taken of this project. I completed a pomegranate
motif as I wanted to see the progression of colors right away)

Monday, November 1, 2010

More Options in Hardanger: Dale Sokolow, designer


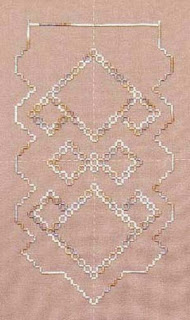
(Photo showing what has been completed so far in this project)


Project: More Options ... in hardanger
WORK IN PROGRESS

Designer: Dale Sokolow

Type of needlework: Hardanger

Photos: 10 so far

Another Dale hardanger project that I have stitched called "Options in Hardanger"

This is an EGA correspondence course: http://www.egausa.org/

Taken through EGA CyberStitchers: http://www.cyberstitchers.org/

Comments: The first project I have stitched from Dale was "Options in Hardanger" and when "More Options ...in hardanger came along, I decided to get on board this one too.

This piece of hardanger is done on #28 Plum Blossom Jobelan fabric using some Watercolours and Anchor #12 Pearl Cotton threads.

The size of the finished piece will be around 8" by 13 1/2".
I have already purchased my bell pull hardware for the finishing.

As you can see, most of it has been done. I still have to fill some diamond shapes, add another row of blanket stitch on top for the hardware to be enclosed in and I will be done.

While looking at the photos below I thought it was interesting to see the different color shades depending on the day's lighting. 


(1st photo taken showing upper and middle sections)

(2nd photo showing top, middle and bottom sections)


(Photo showing the beginning of outside border)


(Outside border completed)


(Photo showing the outside border added on the top and middle sections)


(Same thing but showing the bottom section)


(Photo showing additional work in upper section)


(Same thing but on bottom section)


(Work done on this project so far)