Embroideries

Embroideries

Monday, August 30, 2010

Halloween ornament


Project: Halloween Ornament

Designer: My friend Terry

Type of needlework: Embroidery

Photos: 2

Comments: Another little ornament that was made by my friend Terry on the spur of the moment as she knows that I always have so much fun making them myself too, so she thought of surprising me with one and she did.

The broom is also our way of transporting each others from America to Europe and vice versa, so not sure if the witch if her or myself. It could actually be either of us (grinning). I love little gifts that have special meaning.


Monday, August 16, 2010

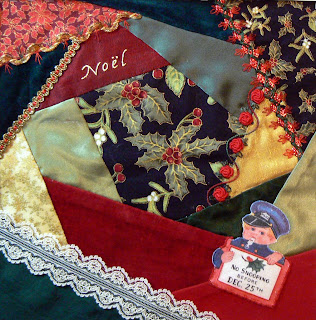
Christmas Crazy Quilting Block

Project: Christmas Crazy Quilting Block
WORK IN PROGRESS

Designer: Something that I am creating

Type of needlework: Crazy Quilting

Photos: 10

A great resource for Crazy Quilters: http://www.pintangle.com/

Comments: This is an unfinished project which I really want to complete. I have chosen a Christmas theme for this Crazy Quilting block as I thought it might inspire me to do something special as I love that time of the year.

First thing I had to do was to find some pieces of fabric that were Christmassy and went well together and then decide on how I was going to put the different pieces of fabric together. The first photo below shows the naked CQ block.

(Photo of naked block)

Then, I picked some lace and trims that I particularly liked and added them to my naked block. This second photo below shows the three I have selected for this purpose.

(Photo showing the first 3 additions)

I then proceeded in stitching two seam treatments which you can see on the third photo below. I have added a close-up photograph of those two seam treatments.

(Photo showing two embroidered seam treatments)

(Close-ups)

When I started this Christmas CQ block I had in my possession a lovely policeman that I wanted to use for this project. I have also embroidered the word "Noel" and added another seam treatment. A few close-up photos have been included below.

(Embroidered the word "Noel" and also added the policeman)

(Close-up for Noel)

(Policeman close-up)

Continuing with my Christmas theme I decided to embroider a reindeer which you can see on the photo below. I did not have room to do an entire one so just went with a reindeer head. There is also a close-up photo below for the reindeer.

(Embroidered a reindeer)

(Reindeer close-up)

This last photograph shows the work that has been done so far on this project. I now need to have a good thinking session to see what else I can add to this Christmas block that would look great.

I will add successive photos on this blog entry.

(Photo showing all the work done so far on this Christmas block)

Saturday, August 14, 2010

Rapunzel: Marion Scoular, designer

Project: Rapunzel
(WORK IN PROGRESS)

Designer: Marion Scoular

Type of needlework: Blackwork

Photos: 4 photos and more to come

Some of Marion's designs and books here

Marion's Achievement Award at National Academy of Needlearts here

Photos showing some of Marion's work here and here

Free online class here

Example of one Marion Scoular hardanger class here

While doing research I found this very interesting article on How to start and end threads

Comments: Here again Marion tells us about Rapunzel like she did for The Princess and the Pea. Here is what Marion tells us this time around.

"Rapunzel"

There was once a couple who longed in vain for a child. A window of their modest home overlooked the garden next door which was owned by a Witch, who filled it with beautiful flowers and tempting vegetables. So envious was the wife that she persuaded her loving husband to sneak through the fence to steal some rampion for her salad. On the second foray, the Witch caugh him, and in response to his plea that he was only trying to please his dear wife, she agreed to let him go, but demanded that in return, she should be given their child.

Indeed, when the child was born and given the name Rapunzel, which means rampion, the Witch took her to a high tower, deep in the woods. There she grew to be incredibly beautiful, with long golden hair. The Witch would stand at the foot of the tower and call, "Rapunzel, Rapunzel all golden and fair, Rapunzel, Rapunzel let down your hair." Whereupon, Rapunzel would unbraid her glorious locks so the Witch could use them as ladder.

Rapunzel sang with the voice of an angel, and one day, this was heard by a Prince as he rode through the forest. Mesmerized, he witnessed the Witch's ritual, memorized it, and when the Witch had gone, used it himself to see at closer hand the lovely Rapunzel. Love blossomed, but sadly, Rapunzel made the naive mistake of asking the Witch why she was so slow and the Prince so nimble. Furious, the Witch slashed off Rapunzel's locks and carried her off to the wilderness.

Using Rapunzel's hair, the Witch lured the Prince back to the tower, where in trying to escape, he fell into thorn bushes which scratched his eyes, blinding him. Doomed to wander for many a day throughout the land, the Prince eventually heard a plaintive familiar song.

Seeing the Prince's blindness, Rapunzel's tears fell on his eyes, restoring his sight. Joyfully they returned to his Palace and have lived happily ever since.

---End of story---

I just think that it makes the stitching of any piece so much more special when you know what the design is really all about. I always love to know where the inspiration for any designs has come from.

Below, you can first see a photograph of the finished project. This photo came with Marion's instructions. Then you can see a few additional photos of what I have done so far.


(Marion's photo of the finished project)


(Tree on the right side of the tower)

(Tree and foliage)

(More foliage surrounding the tree)

*** Additional posting about this project will be added to this post.

--------------------------------

I have received a personal message asking information about a Victorian Heart Pincushion. I normally respond directly to the writer, but I can't this time around as I have unfortunately lost the email. The needed information is right here.
Hope you read this.

Tuesday, August 10, 2010

Casalguidi and Lavender, Barbara M. Kershaw, designer

Project: Casalguidi and Lavender

Designer: Barbara M. Kershaw

Type of needlework: Casalguidi

Photos: 3 so far - more to come as I keep working on this project

Barbara on EGA

Barbara on EAC: You can see a group course of hers there


Taken with EGA CyberStitchers: http://www.cyberstitchers.org/

Comments: This is an unfinished project

I have learned from Barbara that Casalguidi is a village near Pistoia in North Central Italy and that Casalguidi is also the name given to a beautiful form of whitework, which flourished from the late 1800s until World War I, that it is a peasant embroidery. Apparently, the peasants and villagers of Casalguidi first created it to imitate the rich laces of the nobility, which they admired but could not afford. In some cases the ruling classes and governments of the day did not allowed them to own lace.

Ideas and inspiration for the designs were also taken from marble work, carbings and architectural features of the churches and the art of the East and Africa. In Casalguidi and the surrounding countryside, Casalguidi

Embroidery became a cottage industry in part to enable the ladies and girls to supplement the household income. Embroidered bags, purses, pillow covers and cloths were produced to sell to tourists, etc. A school was established in the village to promote and perpetuate the art of Casalguidi embroidery and keep the skill of the traditional embroideries alive.

Thanks, Barbara for providing a bit of background about this beautiful embroidery.

In the photos below, you first see a photo showing what the project will look like when I have completed it. This photo came with the project instruction provided by Barbara.

The second and third photo show the background stitches. I am doing mine using Antique White 32ct Belfast Linen.

I will be adding additional photos right here as I progress on this project.


(Photo that came with the project)

(Photo showing the inner square using four-sided
and modified four-sided stitch)

(Inner and outer square of background)

Wednesday, August 4, 2010

Terra Rosa: Elsa M. Parrish, designer

Project: Terra Rosa
(1990)

Designer: Elsa M. Parrish

Type of needlework: Needlepoint
(Line drawing)

Photos: So far 8

Comments: This is an ongoing project coming from my UFO pile.

As we all knew when I started this new blog that one day I would be more or less caught up with previously finished projects that were on my old blog and that most posting would be either about UFOs that are screaming to be completed or totally new projects that I just can't resist even with my pile of UFOs. Well, today is THE day.

When I saw this project "Terra Rosa) and also another one called "Yut Ta Hey", there was no doubt in my mind that I had to purchase them both, which I did at the time. They both came with line drawing on canvas, threads and instructions.

This one has been sitting for a long time in one of my box and then I took it out at one point and done quite a bit on it actually as you will be able to see by yourselves from the photos below, but there are still a little bit more to be done, which I intend to do and it will be finished this time around. Its UFO status is about to end.

This project is all about Indian potery and it includes the following ones from left to right (see photo below):

  • Double necked wedding jar (done in grey)

  • Shallow bowl (done in pink with some blue)

  • Bridal basket (not stitched yet - will be done in coffee cream)

  • Flat plate (started but not completed - will be done in mauve)

  • Olla - water jar (done in gold)

  • Storage jar (done in mauve)
You can also see the buttes stitched in mauve and I have already completed many lines done with ribbons and special stitches. I still have a few more to do and also the side bars needs to be done.

I had to do some adjustments while stitching Terra Rosa as the line drawings that were traced on the canvas were not the same as the photograph provided by Elsa, so that forced me into doing a bit of improvisation here and there.

I have found this project a bit challenging at times for multiple reasons, but have always loved it and that is the reason why I want to complete its stitching. It will be so nice to have it framed and put on a special wall of my home.


FUTURE POSTINGS ABOUT THIS PROJECT:

You can find out about them here on my blog under: "What I am currently working on and updates on project"
which can be found on the right side of my blog, right after my welcoming message,
as I still want to keep every project together.

Whenever I am ready to add new photos, I will write "Update on the right side of my
 blog with the date" I will also write the same thing on this blog entry until the stitching has been completed and I am ready to start working on a different project. I will then put the completed project photo on TOP of this post. All other photos will be added at the end of this post, except the finished one which will go on top.


(I am just starting stitching the double necked wedding jar and also the ring of the shallow bowl in pink and black)


(On this photo we can see the double necked wedding jar and the shallow bowl all stitched. We can also see the buttes in the background)

(Here we see the buttes, thedouble necked wedding jar, the shallow bowl and the start of the storage jar. I have also included a photo of how the whole design will look like when completely stitched)


(Closeup view of the storage jar)


(This photo shows what has been stitched at this point)


(Now we see the olla or water jar)


(Double necked wedding jar, shallow bowl, olla or water jar and storage jar completed)


(Closeup photo of olla or water jar and storage jar)
Monday, August 2, 2010

Patriotic Heart: Gay Ann Rogers, designer


Project: Patriotic Heart

Designer: Gay Ann Rogers

Type of needlework: Needlepoint

Photos: 6


Shining Needle Society: http://www.shiningneedlesociety.com/

Comments: Gay Ann has a series of little hearts that she has been designing through the years and this is the first one of hers that I have stitched so far.

I have quite a few more waiting in the wings, all absolutely lovely.

For the finishing, I decided to do a "hard" one as I wanted the heart to keep its shape. With a soft one, it would not have been the case.

A few things that I want to say is that I have many finishing books but have not been able to find instructions as to how to finish a heart this way.

I found some instructions for a soft one, which I immediately discarded, another one with a heart opened at the top for someone who wants to put something inside, a bit like an open stocking, but did not want that either, so I had to use the little bit of experience I had in finishing to make this happen.

Because of the shape, I had a little bit more problems than I normally have. I have been wondering why nobody has thought of showing us how to properly finish a heart the "hard way" and not just the "soft way" as I was able to find finishing for all sorts of things I had not even thought about. Lots of good ideas for future projects but none to help me with this current one.

I have put two layers of padding on the front of the heart and only one on the back. Have found some blue silk dupioni silk for the back, the same color as the thread used for the stitching, so used that. Had never made a cording before that looked like a candy cane but with three colors instead of two, so there was a bit of trial and error there, but finally managed to put something together. I decided to use the same cording and make a bow and then undid the lower part of the cording to give it the look that you can see in the photo. My learning curve has gone up a little with this project, which is what I always want to see happening

After having done the finishing on this project, I realized that I only have ONE item to finish and I am done. Everything that I have ever stitched has either been framed by my framer or finished by "little old me" (grinning). That is a great feeling actually. While I was looking at all my finishing books, I got an idea as to how to finish the last one. Hush, hush on this one, you will have to wait and see (grinning even more). 

(Photo showing the beginning of this project)

(This photo shows a nice progression)

(A bit more done here)

(Patriotic heart having been stitched)


(Another photo showing the finished Patriotic Heart)

Sunday, August 1, 2010

Blackeyed Susans: Esther Begleiter, designer


Project: Blackeyed Susans

Designer: Esther Begleiter
(Stitch Arts, Inc.)

Type of needlework: Brazilian Embroidery

Photos: 2

Comments: This is a little design I stitched years ago when I wanted to learn how to do Brazilian embroidery. I just love Blakeyed Susans. Have had some in my garden for years now and looking out the window I can see them in full bloom from my stitching/computer room upstairs. What a lovely sight.

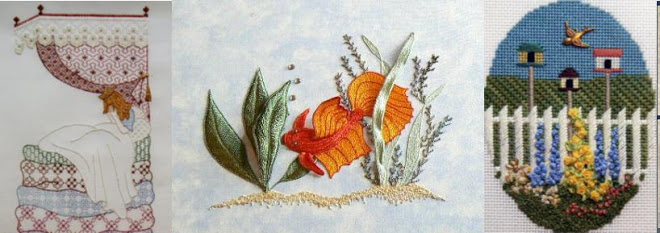
Below is a photo showing three Brazilian embroidery projects I have stitched and finished as ornaments.

Here are the links for Rhapsody and Minuet.
.
(Photo showing Rhapsody, Blackeyed Susans and Minuet)