Embroideries

Embroideries

Friday, April 30, 2010

Flag Tag (A Name Tag), Gay Ann Rogers, Designer


Project: Flag Tag (A Name Tag)

Designer: Gay Ann Rogers

Type of needlework: Needlepoint

Photos: 4


Shining Needle Society: http://www.shiningneedlesociety.com/

Comments: I liked this little name tag for its simplicity and beauty. The finishing was also part of the stitching, so that was something different for me to try.

Once the stitching is done, all I have to do is to put my name tag into a plastic folder and pin it on myself, but instead of having those ugly paper ones, this one is all embroidered.


(Photo showing the two rows of Nun's stitch all around)
(Here we see a section of the flag already stitched)

(Close-up showing the whole flag stithced with name included)

Thursday, April 29, 2010

Florentine Pincushion: Brenda Day, designer


Project: Florentine Pincushion

Designer: Brenda Day

Type of needlework: Bargello

Photos: 4

Comments: I absolutely love this project. It was a real pleasure to stitch as bargello normally is for me and those colors were "delicious". Yes, I could almost eat them.

Though Brenda intended this project to be used as a pincushion, I am using mine as a little decorative pillow. I already have many of different sizes, style of embroidery and colors. I just love them.

Both sides, left and right, are exactly the same but upside down and it really makes for an interesting design.

This design asked for DMC Perle cotton #5 and also some stranded DMC cotton threads with one additional requirement, BEADS that were used for the corner tassels, a nice little touch to the finishing.

(Photo showing the border all around with the middle separation)

(Both sides stitched)

Photo of the book where this project came from. We even see the picture of the little pincushion on the left
comfortably sitting on the chair.
Name of book: Bargello, A fresh approach to Florentine emboidery
by Brenda Day

Wednesday, April 28, 2010

Goldwork Fountain Pen: SharonG, designer


Project: Goldwork fountain Pen
(Painted canvas)

Designer: SharonG

Type of needlework: Goldwork and Needlepoint

Photos: 6

Sharon G. website: http://www.sharong.com/


Box purchased here: Sudberry House 

Comments: This is a painted design I purchased ages ago and after leaving it in my pile of unstitched projects with all the others for the longest of time, I finally took the painted canvas out and stitched it.

I had purchased it for a gift. I can't remember if it was for my husband's birthday or Christmas. The only thing I do know is the fact that many Christmasses and birthdays came and went before he finally got it. It happily sits on his desk with all his beautiful pens inside the box, all tucked in.

The photo below shows part of the pen stitched. What is missing is the stitching on the top part of the pen and also the background stitches. For some reason I seem to have forgotten to take photos of that section after it was completed. You can still see it in the other photos fortunately. I changed a few things in SharonG's design as you will be able to see when looking at the very last photograph below.

(photo showing all stiching except the top part of the pen and the background)


(This is another view of the box)


(Still another view)

(...and another view)

(This photo came with SharonG's instructions, the way she stitched hers)

Tuesday, April 27, 2010

Halloween ID Card


Project: Halloween ID Card for Terry

Designer: I took the witch design from http://cathycreatif.free.fr/index_galerie.php
and added details to make it look like a real Witch ID Card
(if such a beast has ever existed)

Type of needlework: Mixed media and Embroidery

Photo: 1

Comments: Anytime that I get close to Halloween I start feeling the urge of stitching something a bit on the wild side and that was no exception for some past Halloween when I decided that I wanted to make something special for my friend Terry and I thought to myself what could be more personal than giving Terry her own Halloween ID Card, right?

There has been an ongoing joke between the two of us, with her jumping on her broomstick to come visit me in order to save on petrol (she lives in the UK) and I live in the USA and they don't put "gas" in their car overthere like we do here but they rather put "petrol" instead (grinning).

I was real concerned that with all the Halloween sky traffic, some overzealous policeman might stop her and ask her for some identification. She could nott very well show him her driver's permit since she would be flying and not driving, so I thought that with a Witch ID card made especially for her, she might then be ready for all eventualities no matter over which country air traffic space she might happen to be flying over at any given time.
I scanned the photo as the digital camera was not giving me good pictures, but I am afraid that her hair got a bit squeezed in the process. Oh well, we can't win them all.

It was actually a long process to make that little ID card as first I had to decide on some drawings for the witch, then I had to find photos for the ID itself, put the two together in a design, then I added a bit of color with Prismacolor crayons, then scanned it and printed it on fabric. After that I actually started stitching, then added a bit more color this time with some watercolor crayons and a little bit of water, then I found some purple fabric for the back, put a little padding in between and stitched the back with the front.

Of course, I had to write Terry's name with profession and I could not resist the impulse to stitch a little spider too. No Halloween respectable photograph would find itself without either spiderwebs or spiders, so added that last detail. Since I did not want the stitching community to think that Terry is a witch in real  life, I stitched her a plastic nose which is being held with an elastic. I gave her some reddish hair as those are Terry's natural hair color. I did not want to make her clothing too chic either as she is a witch after all and they are not supposed to be well dressed, at least I don't think so.

I had lots of fun with this little project and Terry also had fun with it showing it around.

Monday, April 26, 2010

Rhapsody: Amy Wolfson (Amybear), designer


Project: Rhapsody

Designer: Amy Wolfson of Amybear

Type of needlework: Needlepoint

Photos: 2

Amybear Designs' website: http://www.amybear.com/

Comments: A group of us from the Yahoo group Needlepoint Etc. decided that we would do Rhapsody together using our own choice of colors. We even had our own Yahoo group just for that project.  Looking back at my own color choice, I am not sure what I was thinking back then. I would choose something very different today than I did years ago. 

I think it was Nancy R. from Chicago who had the best choice of colors, at least from my own standpoint. She had perfectly nailed it. I am trying to remember what her color choice was as it has been such a long time since I have seen her piece. I think it had different shades of pink with some green. The graduation of shades and colors was absolutely wonderful, just right. It made me regret my own choices even more, but hey that is life. We learn as we go along, at least I hope we do (grinning).

Most of us used Vikky Clayton's threads, which can be found on her own website called Hand-Dyed Fibers.

(Photo before framing)

Sunday, April 25, 2010

The Butterfly Fan: Jackie G. Le Vasseur, designer

Project: The Butterfly Fan
(also called The Oriental Fan)

Designer: Jackie G. Le Vasseur

Photo: 1

Type of needlework: Needlepoint

Comments: This is a Guild group project that I took what seems to me ages ago, but it is always fun to look back at old projects. The fan was designed to be stitched in values of blue on eggshell congress cloth and contains both a butterfly and a flower. I love Jackie's idea of adding a little tassel. I think it adds such a nice little touch to the framing.

Saturday, April 24, 2010

Under the Sea theme needlecase: Elsie Ottinger, designer

Project: Under the Sea theme needlecase

Designer: Elsie Ottinger

Type of needlework: Crazy Quilting

Photos: 3

Comments: We often made exchanges between members when I used to belong to Crazy Quilting International. This time around we were making a  needlecase exchange. I have received this Under the Sea theme from Elsie.

She knew that I have always loved "Under the Sea" scenes and she created this one especially for me. I have always loved it and have immediately put my Brazilian embroidery  needles in this one as she especially love doing Brazilian embroidery.

UPDATE on Persian Fantasy:

I have just received Persian Fantasy from our framer. See the 3 additional photos at the end of the initial post of Persian Fantasy here.

(Photo showing the back of the needlecase)

(On this photo we can see the entire needlecase from its backside)

Friday, April 23, 2010

Little Angel: Gift from Jill


Project: Little Angel

Designer: Jill (member of CQI)

Type of needlework: Mixed media

Photo: 1

Comments: Jill who was a member of our little Crazy Quilt International group made this lovely angel for me.

I had seen a smaller version that Jill had made and thought it was just absolutely darling. I asked her how she made it, as I was very interested in making one for myself, if at all possible.

Jill did more than that, she made me a bigger version just for me. I was so very happy when one day I received a box from Jill and here it was, my own Angel.

I have preciously kept it all these years and as it is not far from my computer, I can see it  when looking a bit sideways as I am typing this blog entry.

Thursday, April 22, 2010

Seeds of Love: Brenda Ryan, designer


Project: Seeds of Love

Designer: Brenda Ryan of Victoria

Type of needlework: Embroidery

Photos: 5

Inspiration magazine issue #51 project, pages 66-69

Comments: This is the kind of project that are hard for me to resist, something useful and beautiful at the same time.

Brenda has created two lovely designs in two different sizes with this theme. One is just right to serve as a little coin purse and the bigger one looks wonderful as a fabric envelope to store things inside.

I have kept the little coin purse for myself and made the fabric envelope as a gift for a friend. The project was just as much fun to make as it looks. I have been wanting to make a few more of them using different fabrics and I need to make sure that I do. They are so well worth the time spent on them, which is not that much considering how good they look.


(Photo showing the stitched design - can you see the little flower head on top looking upside down?)

(Photo showing the little coin purse all finished)
(Here I have turned the picture 180 degrees so that you can see the little flower head looking straight at us)

(This photo shows the fabric envelope that I made for a friend)

Wednesday, April 21, 2010

Winter Reflections or Mystery #2: Loretta Spears, designer


Project: Winter Reflections
(Mystery #2)

Designer: Loretta Spears

Type of needlework: Needlepoint

Photos: 8

Comments: This project is a joint venture between another stitcher, Sharon D. from South Carolina, and myself.

I was at the time stitching another Loretta Spears project (Superstition) when I was contacted by Sharon D. about Winter Reflections. She had started stitching it a while back and had to stop for health reasons and she wanted to know if I would like to have it and finish it. The answer was a resounding "YES" and she mailed it to me. The following photo shows how much Sharon had already stitched on it.

Another interesting point about this project is the fact that Sharon D. had purchased this pattern directly from Loretta Spears herself in her own store which was located somewhere in Colorado.

So, with this project, there are parts of three different persons, Loretta who held this pattern in her hands, sold it to Sharon D. who in turn stitched a good portion of it, then it arrived at my home.  I finished the stitching already started by Sharon D. and had it framed. Perhaps we can also add my husband who helped to select frame and mat and of course my framer who never spares any efforts to do her very best to make us happy.

All this makes this project a very special one.

My friend Pat has also stitched this project before I did and you can see hers her on her blog called Needle Art Nut

Final note: Loretta pointed out the fact that her design could be shown either vertically or horizontally. I chose the horizontal option myself as I felt it looked better somehow.

Special thank you to Sharon D. for giving me this lovely piece.

(Photo showing sections already stitched by Sharon D.)

(First 3 lessons completed)

(Close-up)

(Closer close-up)

(First 4 lessons completed)

(Photo showing the stitching completed)

(Winter Reflections framed)

(Frame close-up)

Tuesday, April 20, 2010

The Princess and the Pea: Marion Scoular, designer


Project: The Princess and the Pea

Designer: Marion Scoular

Type of needlework: Blackwork and Hardanger

Photos: 12

Marion's instructions for this project can be found on the NeedleArtworks website.

LEGEND: First, let's read  what Marion Scoular has written for us concerning the legend about

THE PRINCESS AND THE PEA.

Once upon a time there was a Prince who longed to marry a real Princess. He searched all over the world to find her. There seemed to be plenty of Princesses but for one reason or another, the Prince could never be sure that they were, in truth, what he sought. Disconsolate, he returned to his castle. Slowly he grew paler and thinner, pining for a real Princess.

One evening there was a terrible storm. The wind blew, lightning slashed the sky, thunder crashed and rain lashed the countryside. Suddenly a knock was heard at the castle gate. The guards hurried to the gate, holding their lanterns high above their heads.

There at the gate stood a Princess. Rain had soaked her hair and streamed in rivers from her gown to her toes. But she was a Princess ... a real Princess ... she told the guards, and had become lost in the storm.

"A real Princess?" asked the Prince, in disbelief. "We must make sure," said his mother the Queen. She prepared a bed for the Princess, made with ten mattresses filled with the softest eiderdown. Beneath the first mattress on the boards of the bed, the Queen placed one small dried pea. The Princess, unaware of this, climbed up to sleep on top of the feather mattresses. In the morning, everyone in the court gathered to hear the Queen ask her how she slept.

"I hardly slept a wink," moaned the Princess. "I am bruised all over. My bones ache as if they were broken. There must have been some frightful object in my bed".

"She is indeed a real Princess," proclaimed the Queen. "No one but a real Princess could have such tender skin!"

The delight of the Prince knew no bounds. The King and Queen were well pleased. The Prince married her the very next day because now he knew she was a real Princess.

And the pea can be seen on a pedestal in the Royal museum to this very day.
(end of story)

Comments: This is really a project that I enjoyed stitching from start to finish. The design is beautiful and I guess it brought back the child in me with this lovely legend.

The brochure is very well written and it was not difficult to follow Marion's instructions.

I was blogging pieces at the time which would explain why I have so many photos to show you today.


(Photo showing the bed with the first 2 mattresses and if you look under the first mattress you will see the little round pea, which has not yet been stitched )


(3 mattresses now)


(4 mattresses)


(Going up to 5 mattresses)


(6 mattresses)


(7 mattresses)

(8 mattresses, getting pretty high)


(9 mattresses)

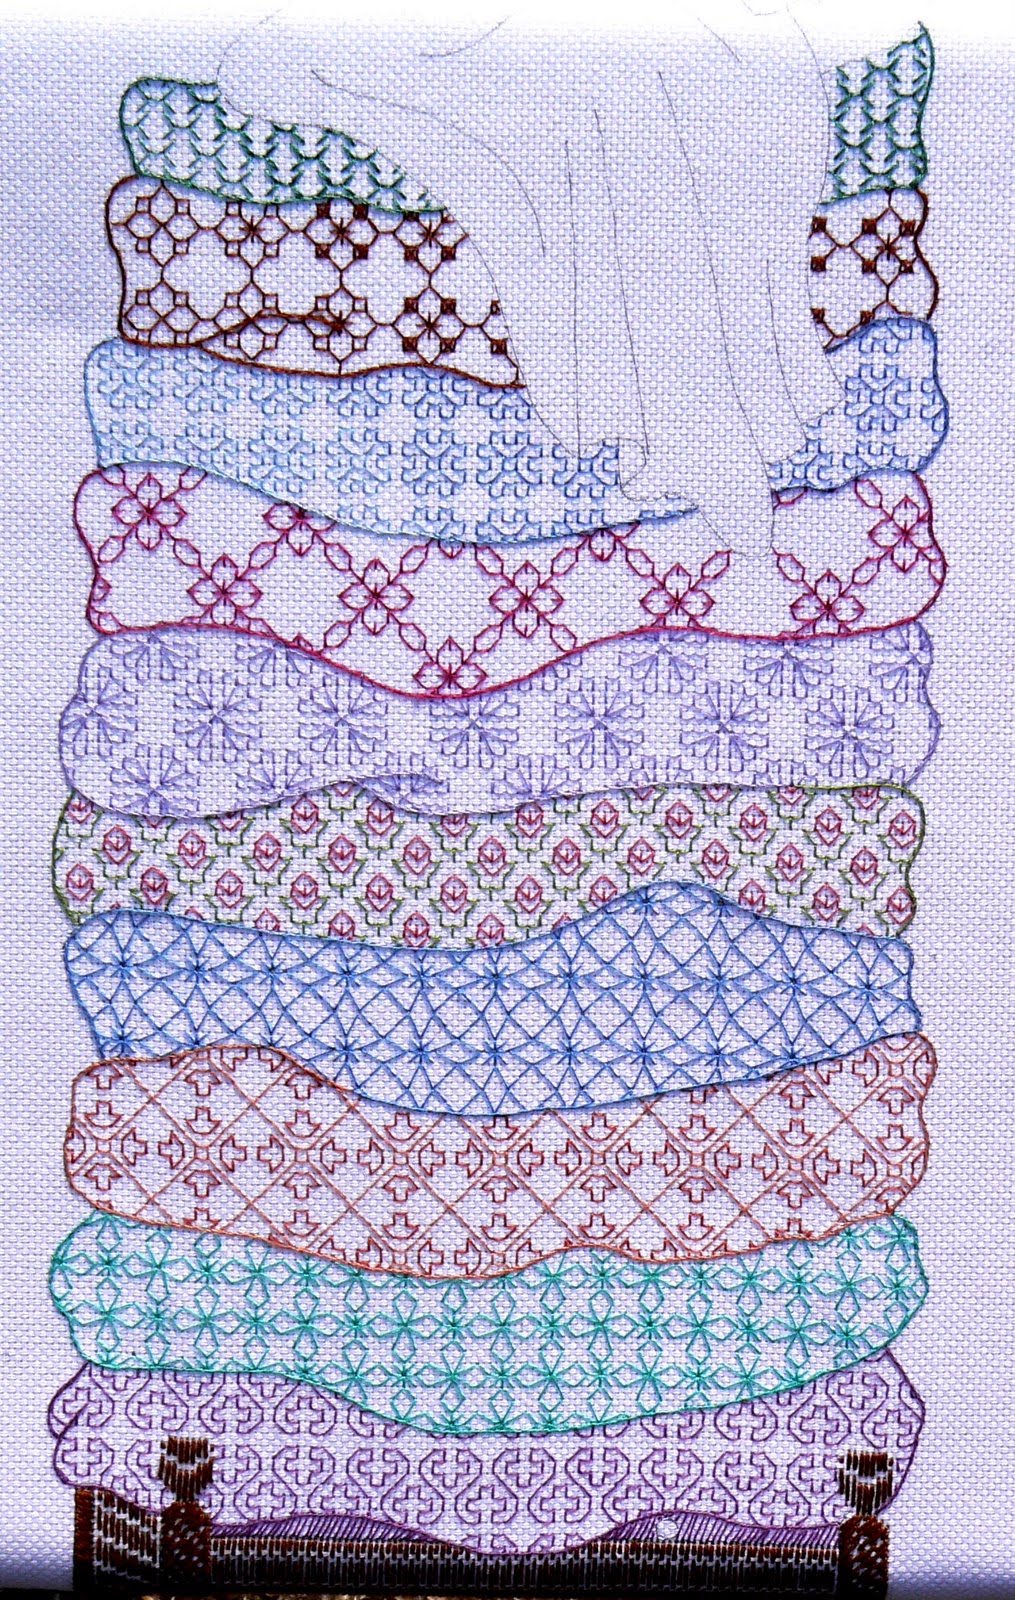
(10 mattresses - this is as high as this goes - would not want to fall from that height myself)


(This photo shows the blanket, hardanger canopy, canopy drapes, tassel and the Princess herself)


(Fun frame for this project - Don't forget to look at the little pea under the first mattress - you may also have a look at the very first photo way way up this post so that you can have a good view of the little pea)

Monday, April 19, 2010

Posy Scissor Poke: Sue Hawkins, designer


Project: Posy Scissor Poke

Designer: Sue Hawkins

Type of needlework: Needlepoint

Photos:8


Comments: This is a kit that I purchased some time ago and it stayed in my pile of things to do for quite a bit of time until I made the decision that I wanted to stitch this project.

This project is mostly stitched using the tent stitch.

I rarely do projects that use the tent stitch almost exclusively as it tends to bore me to death, which also explains why I love working in so many different techniques. Doing so keeps me on my toes all the time as I do need a bit of challenge in my stitching life, though I must say that every single project teaches me something and this one was no exception.

It took me a few trials and errors to figure out the best way to stitch together the last two seams but I got it in the end, which is what counts. My learning curve has gone up a little bit with this project as it should be.

As it so often happens when I make some research about the designer  of the piece I have been stitching I discover interesting informations and this time was no exception with Sue Hawkins. I found out that Sue had her own website and many very interesting projects, something that I had no idea about. I can't remember where I purchased  this project but I do know it was not directly from her website. It could have been from either one of the British Guilds or Country Bumpkin in Australia.

Anyway I am glad that I have found out about her designs and may very well stitch something else of hers in the future.


(Photo showing the scissor case and a pair of bigger scissors beside it)

(Photo showing the scissors inside the case but not completely down)

(Scissor case closed with the blue scissors inside)

(Photo showing the case with some smaller scissors)

(Photo taken after the stitching had been completed)

(Photo showing a ring and a piece of felt for the inside of the scissor case)

(Photo showing the instructions that came with the kit)